02
Drawing Machine:
Entry to Making
19.08.2024 ~ 25.08.2024
Feedback
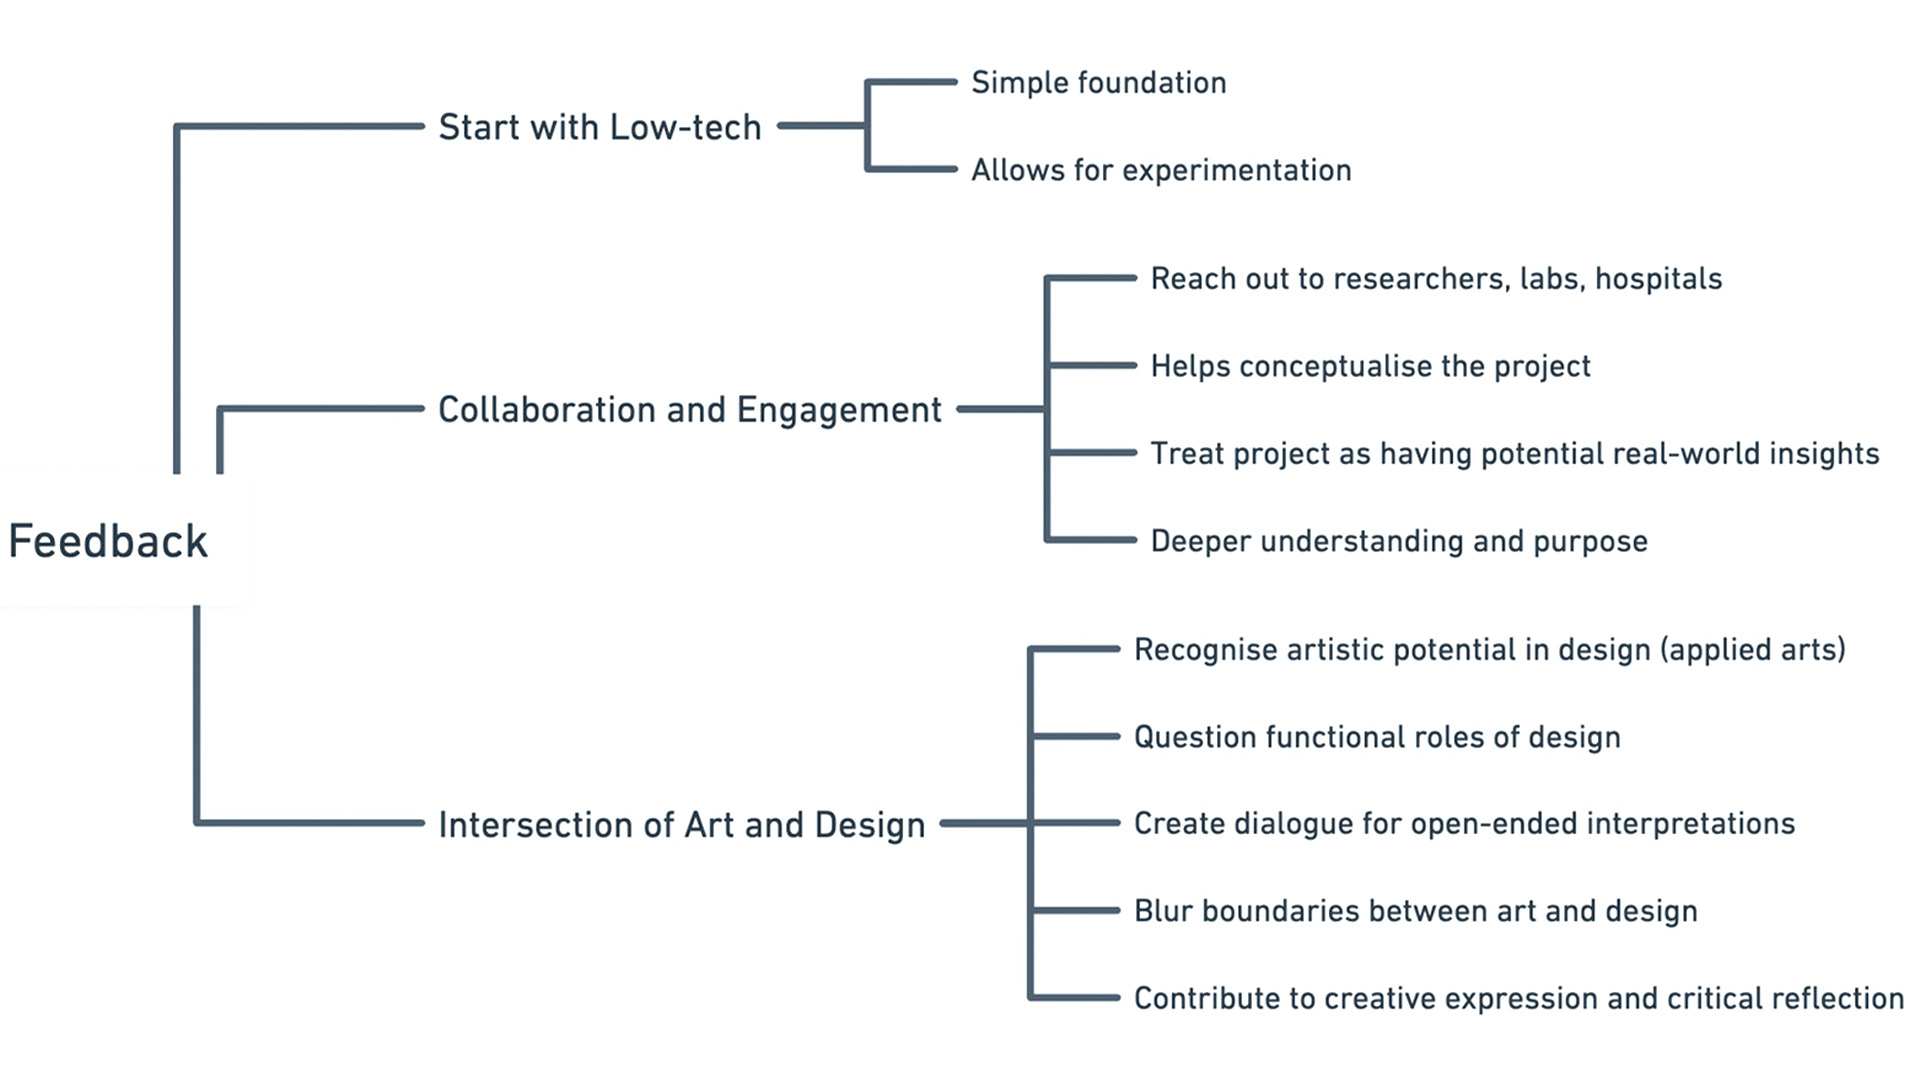
The most beneficial aspect of feedback sessions is that they not only allow us to share different perspectives but also offer a chance to test out our structure. Different ways of articulating and reiterating the information they received can emphasise aspects we might not have considered, reframing the concepts at face value and help sort out our priorities for the overall content.
-
Notes from Feedback Session
Jung Yun So
I was advised to begin my project with low-tech. I assume starting simple
can halp me build a solid foundation for experimenting and exploring ideas without the complex issues
that high-tech approaches might introduce early on.
Another suggestion was to reach out to researchers, labs, and hospitals that might be interested in my
theme. Although a BA graduation project most likely will not directly impact professionals, I do think
engaging with them could direct my project to a more practical context. Also, by treating my work
as though it could provide actual insights, I can approach my research in depth and with a stronger
sense
of purpose.
One feedback that I appreciated was that my topic is somewhere between art and design. I believe this intersection of art and design can offer a critical perspective on both fields. It recognises the artistic potential within design—which I would refer to as applied arts—while simultaneously questioning the functional roles that are often attributed to it. This convergence can create a dialogue that values ambiguity and open-endedness, along with a range of interpretations and insights. I do hope to contribute, however miniscule, to blurring these boundaries so that design can move beyond its conventional limits and become a platform for both creative expression and critical reflection.
Research through Design
-
Attempt at a Mindmap for Design Approaches
Jung Yun So
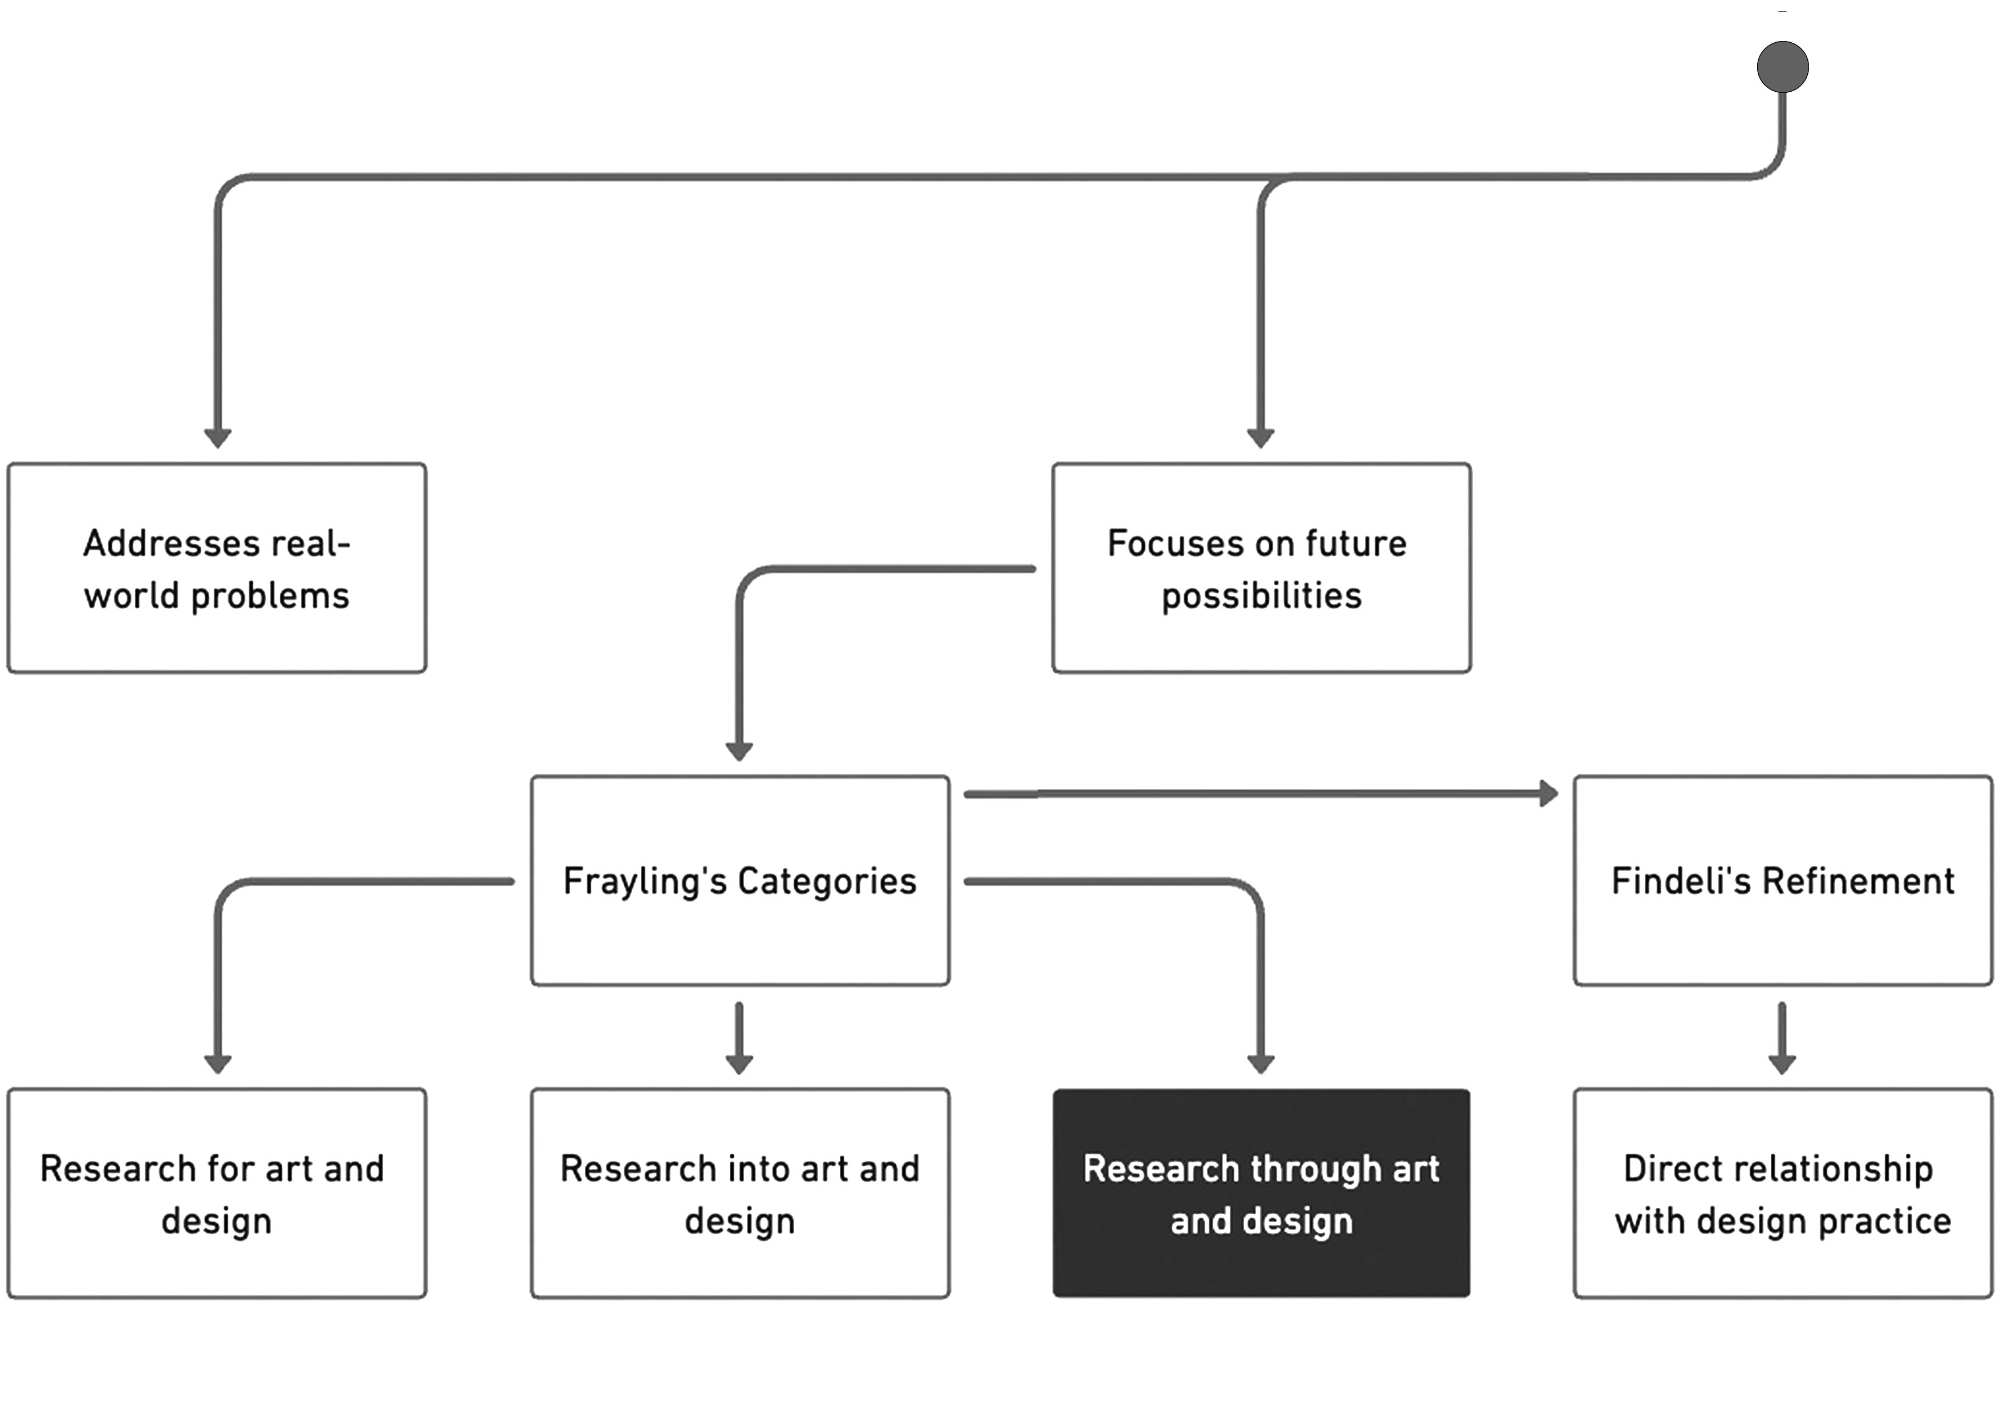
It was also suggested that I explore Research through Design (RtD) as a methodology. This approach combines scientific inquiry with design practice, aiming to address complex, real-world problems by focusing on future possibilities rather than definitive truths. The concept of RtD has evolved over time, with Frayling categorising research in design into three types: research for, into, and through art and design. Findeli later refined these categories.
Despite its growing use, RtD still lacks a unified definition. Various scholars have different approaches, framing it as constructive design research and practice-led research. RtD operates under ontological and epistemological assumptions, prioritising insights from the design process itself over reproducibility. To maintain purpose, detailed documentation and reflection are essential, which can be supported by tools like the Process Reflection Tool (PRT).
Pulse
-
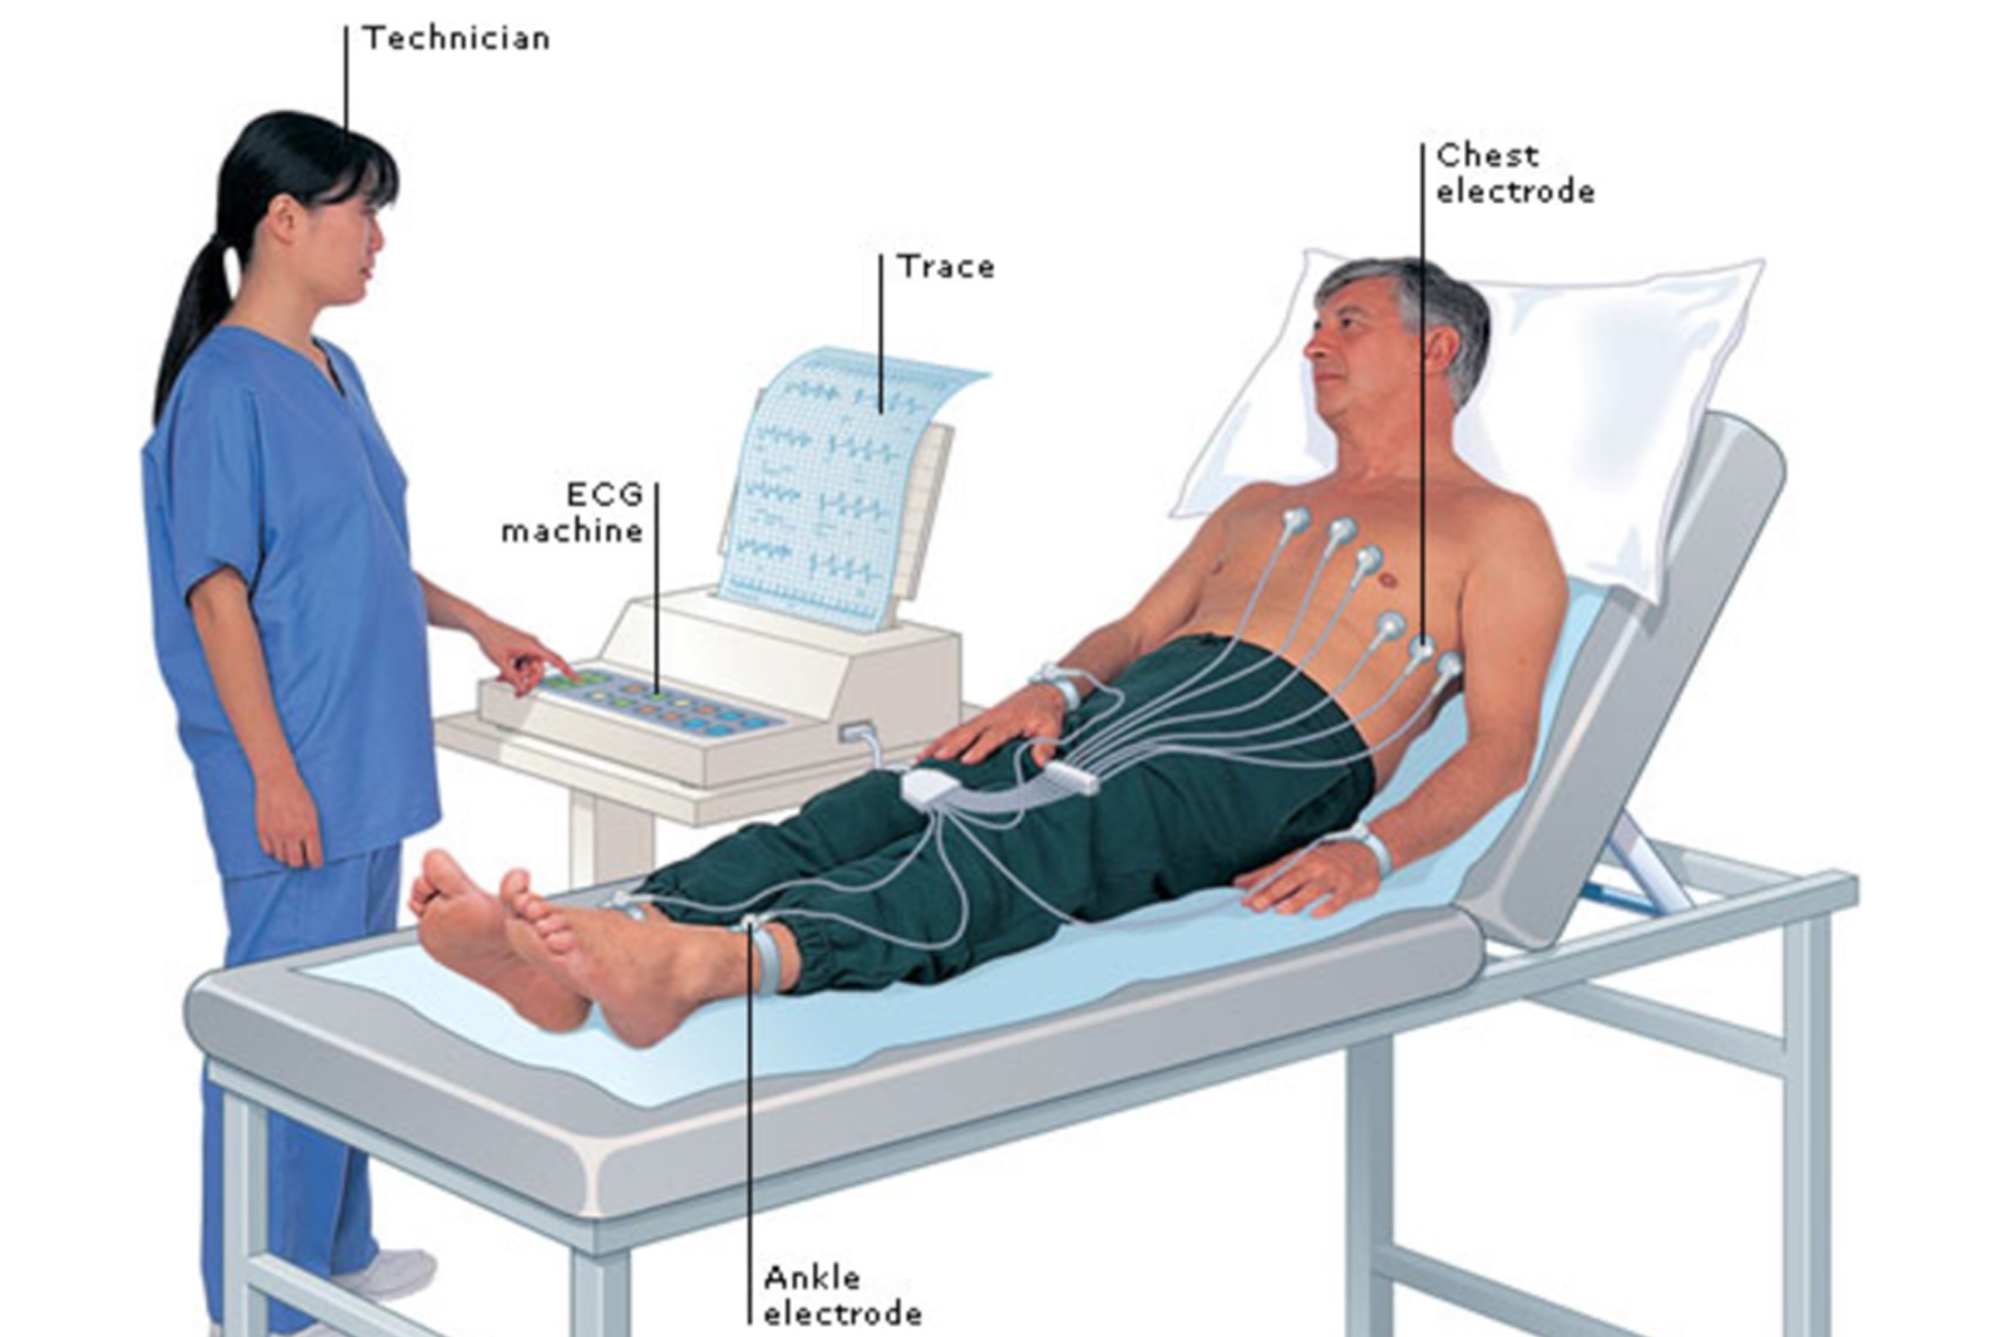
Typical hospital-based standard ECG monitoring system
Design and fabrication of textile-based dry electrodes for ECG monitoring, Abreha Bayrau Nigusse
-
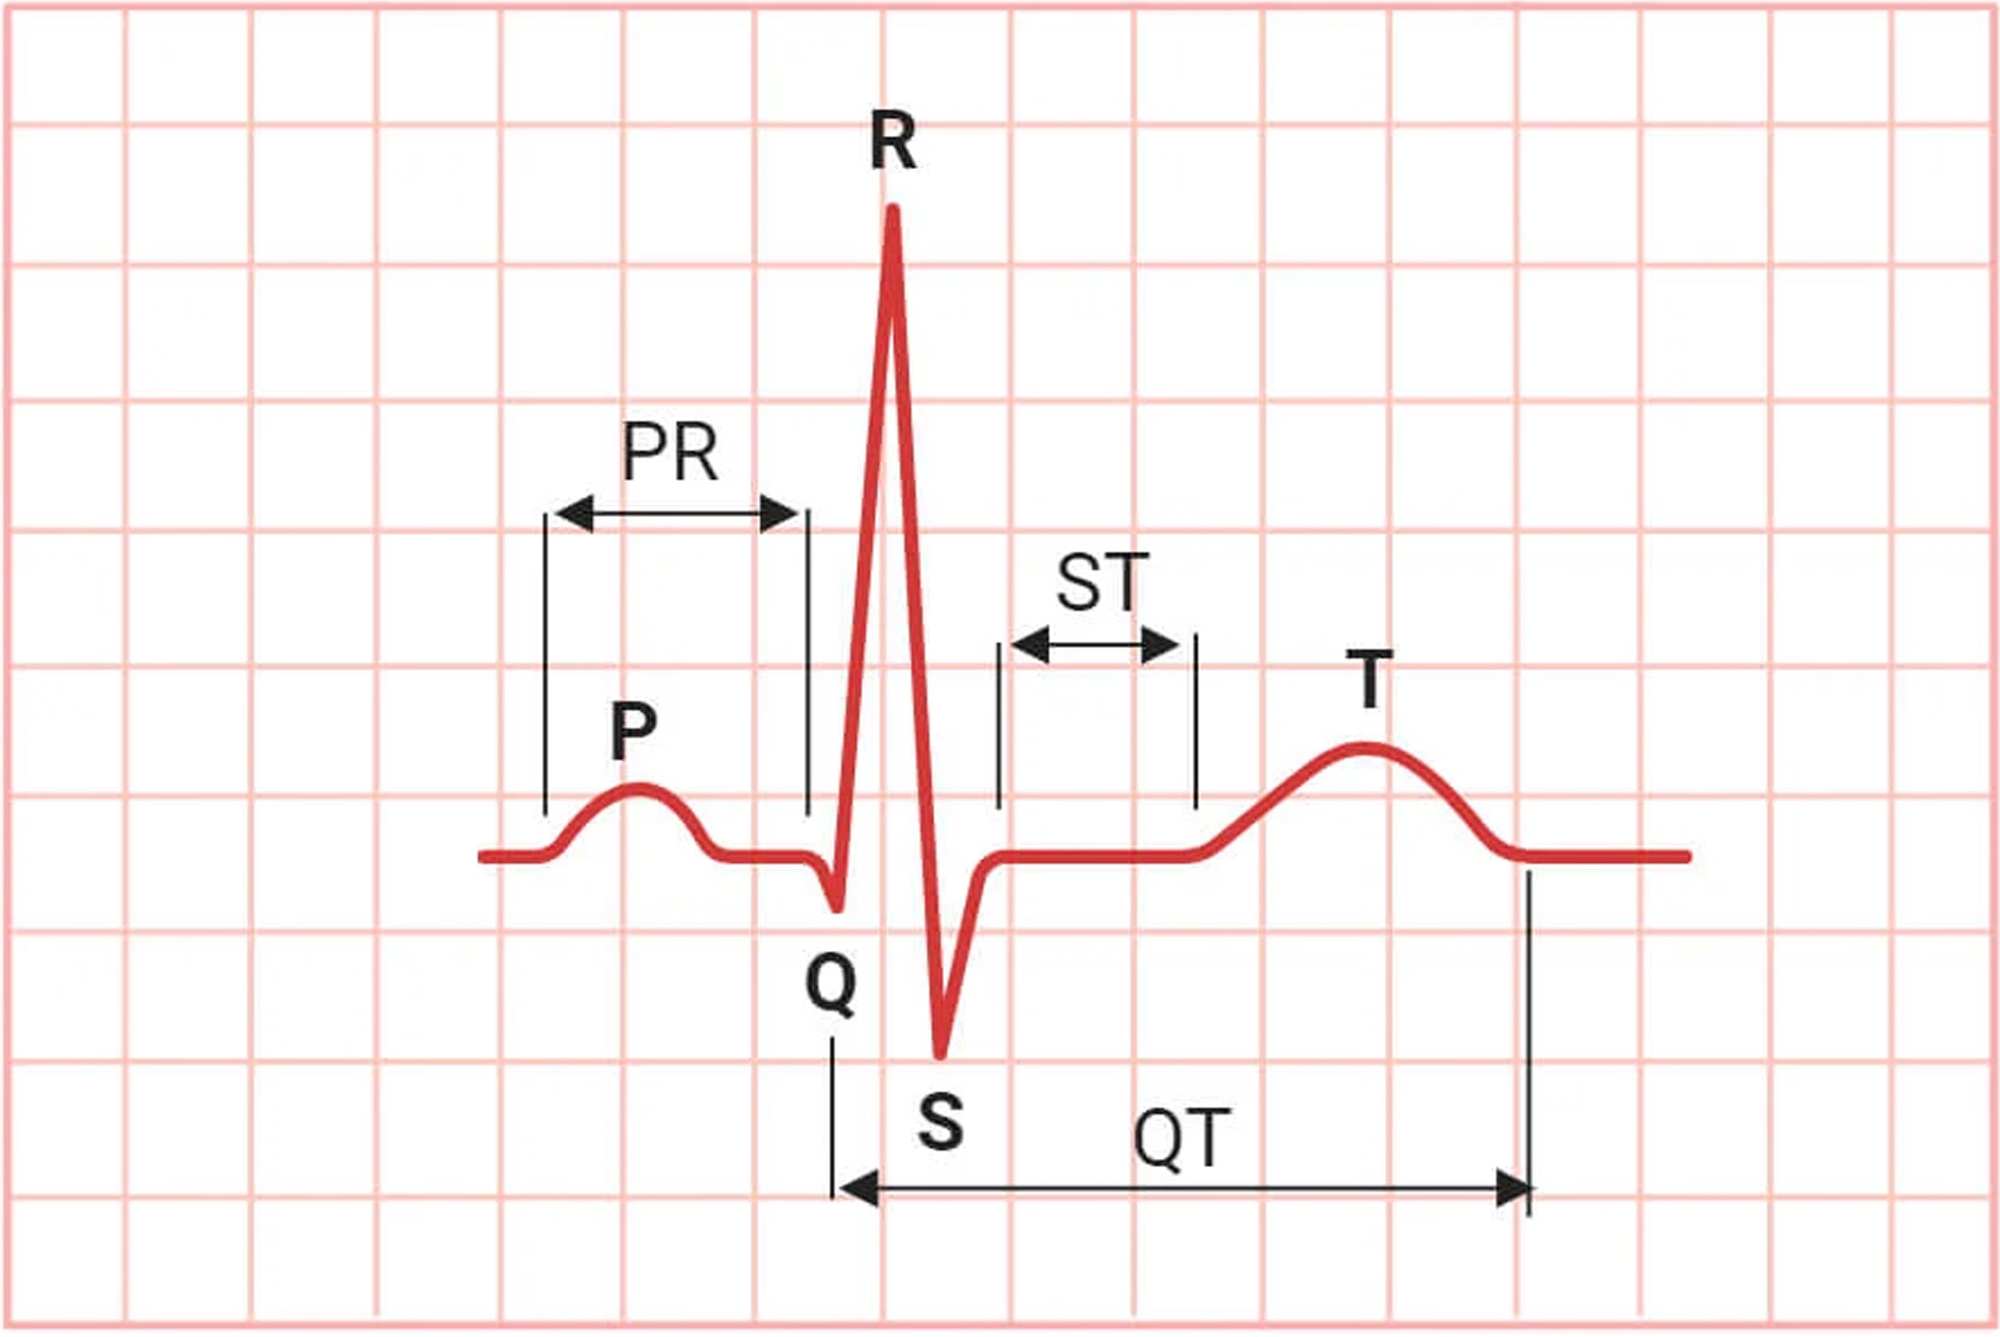
Electrocardiogram (ECG)
microbenotes.com/electrocardiogram-ecg/
A quick recap on pulse. Pulse can be measured by monitoring the heart rate. It involves counting the heartbeats either manually, using touch, or electronically, using devices like Photoplethysmography or Electrocardiogram monitors. There is also Heart Rate Variability (HRV), to record stress or nervous system function.
Electronic pulse sensors, such as those used in Arduino, detect changes in blood flow and translate them into digital data. This data can be used for health monitoring, or in my case, creative applications like biofeedback systems, where the heart rate can be reflected as visual outputs in real-time.
Building a Drawing Machine
-
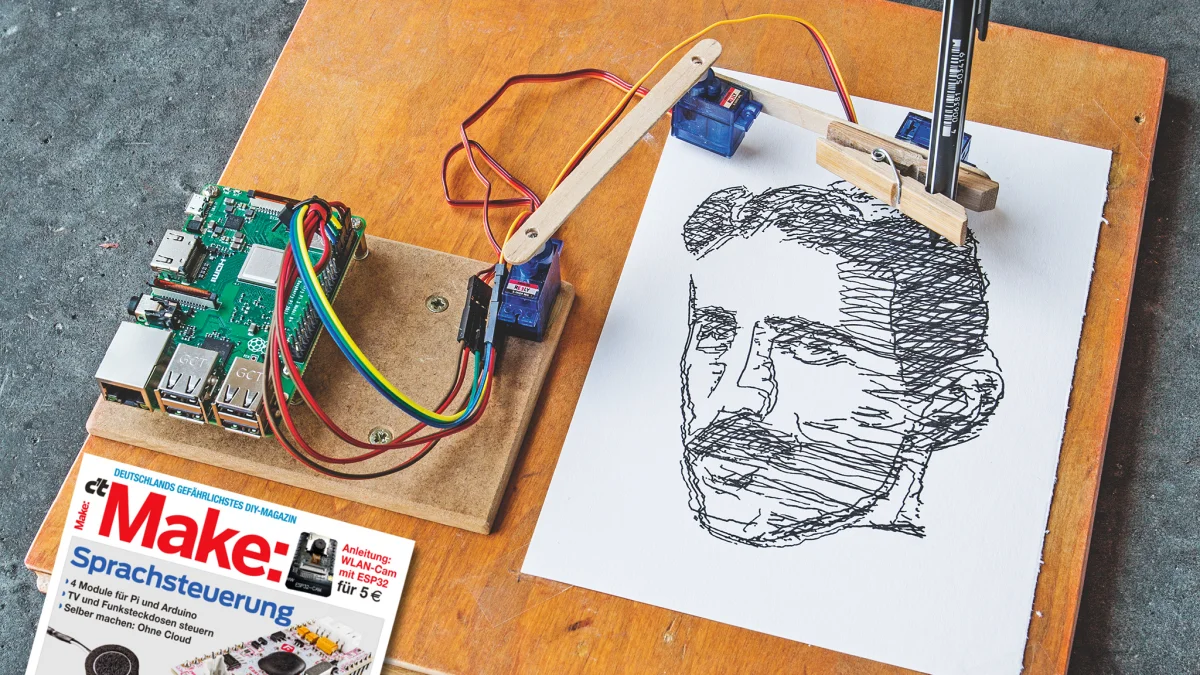
Brachiograph
heise.de/news/BrachioGraph-Eisstielplotter-mit-Raspberry-Pi-4653448.html
To start with experimenting for my catalogue of making, I turned to what I thought would be an obvious approach. A drawing machine, or in my case, a brachiograph (which means arm-writer). This economical pen plotter is originally powered by a Raspberry Pi and was invented by Daniele Procida. It’s a relatively simple project, making it a great way to alter to my needs and get started with physical making. I could begin using cyclical movements in an abstract way for a visual outcome.
I think that the brachiograph ‘arm’, in its articulation, resembles the movement of a human limb, each stroke a reflection of the physiological impulses. I hope this to be a primitive demo of how a simple machine might translate biofeedback into physical movement and traces as it captures the physiological responses in real-time. Though I could generate these patterns on a screen, my first attempt is to observe the machine's physical interaction with the canvas, adding a tangible layer to the experiment.
To begin, I assembled the following components:
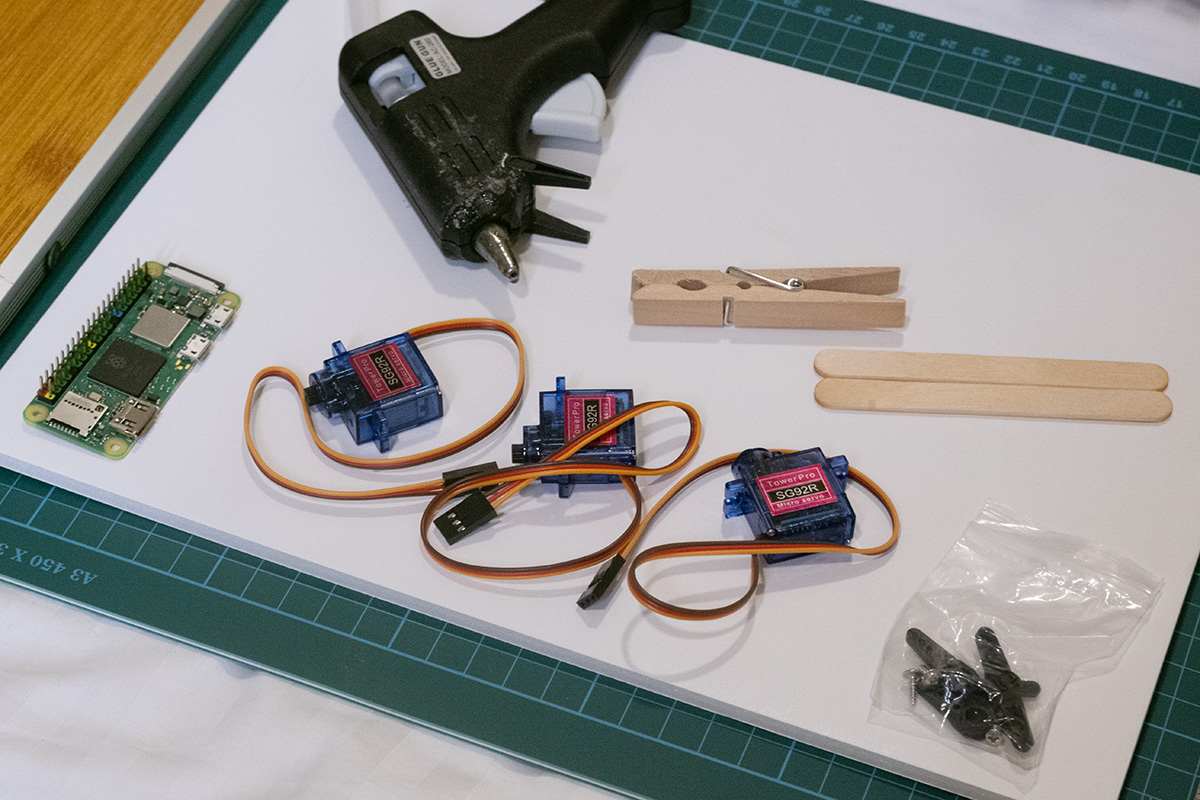
Components
Jung Yun So
- An Arduino Uno (for the original, any Raspberry Pi model will work)
- Three servo motors
- Two sticks (leftover ice cream stick, about 3mm thick)
- A clothes peg to hold the pen
- A pencil or pen
- Adhesive (glue gun)
- Wiring components (breadboard and jumper wires)
Servos
-
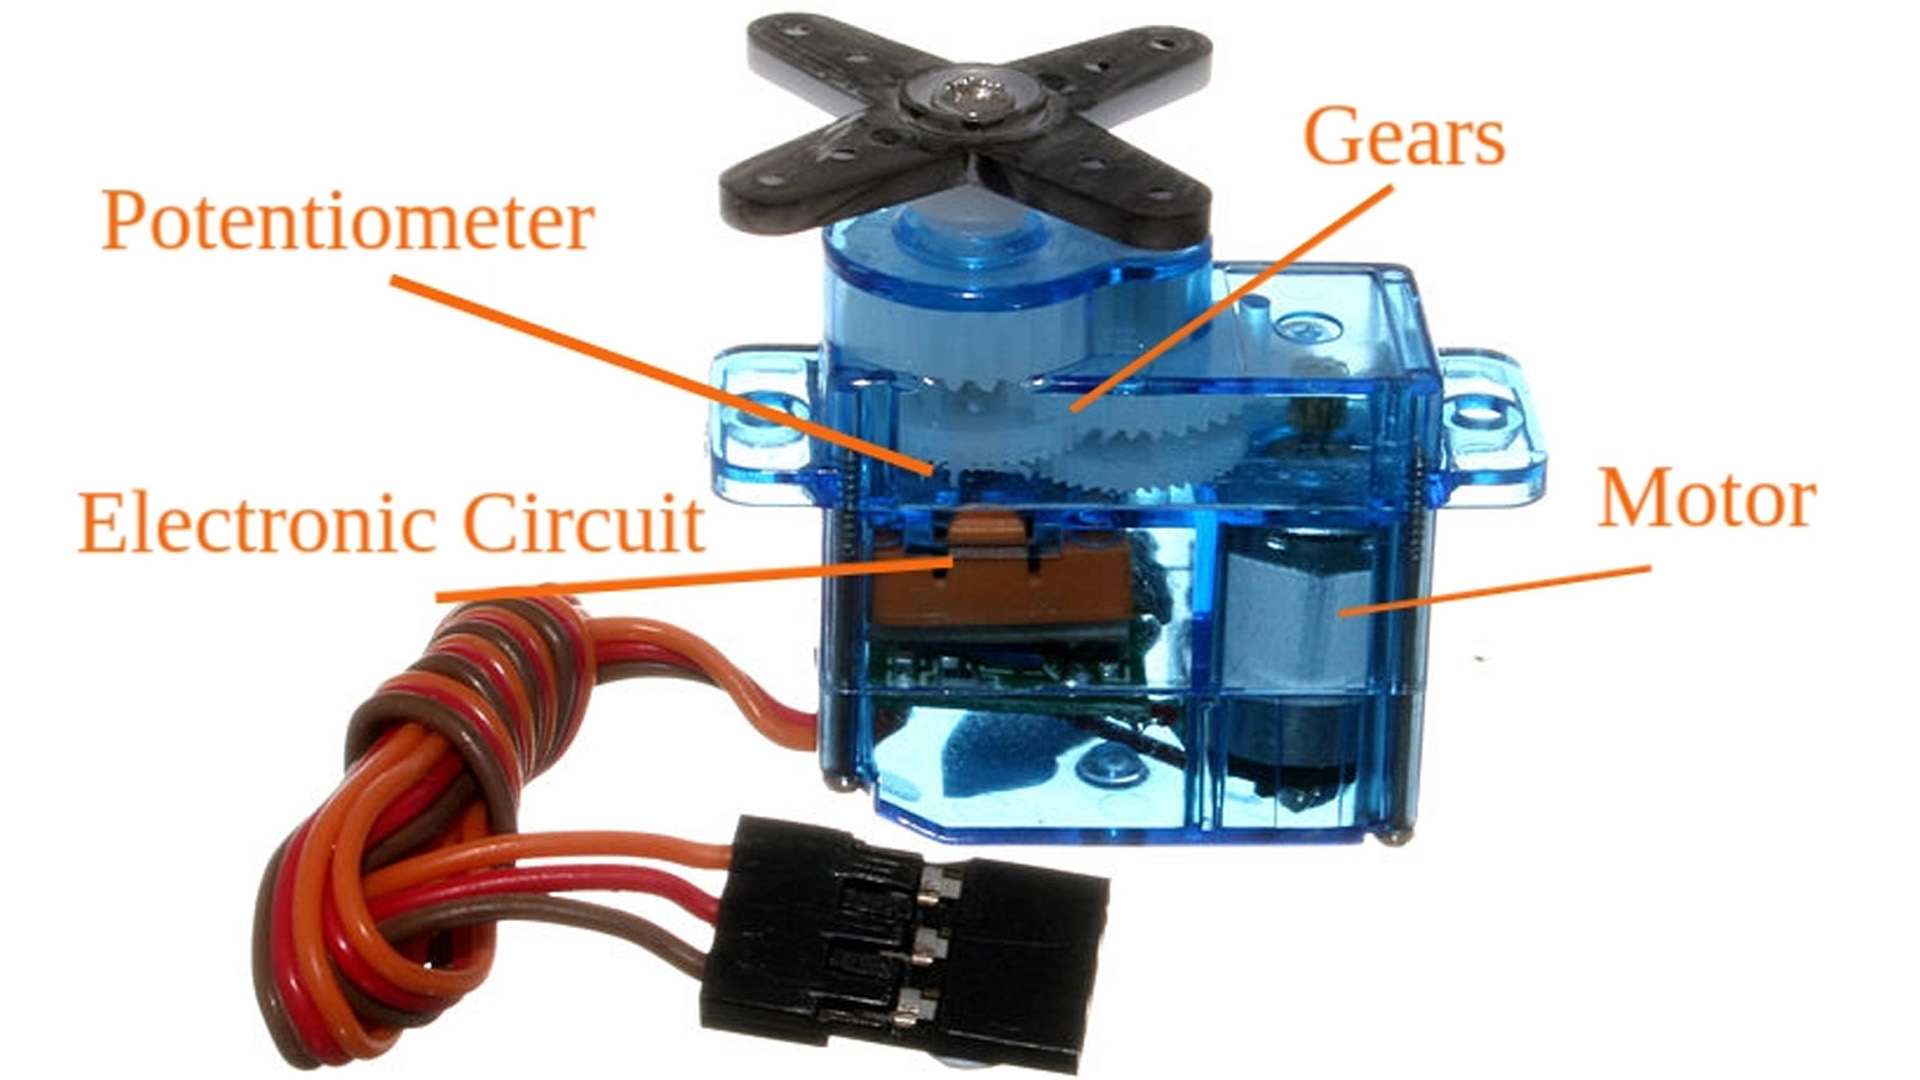
Components of a Servo
solomotorcontrollers.com/blog/servo-motor/
-
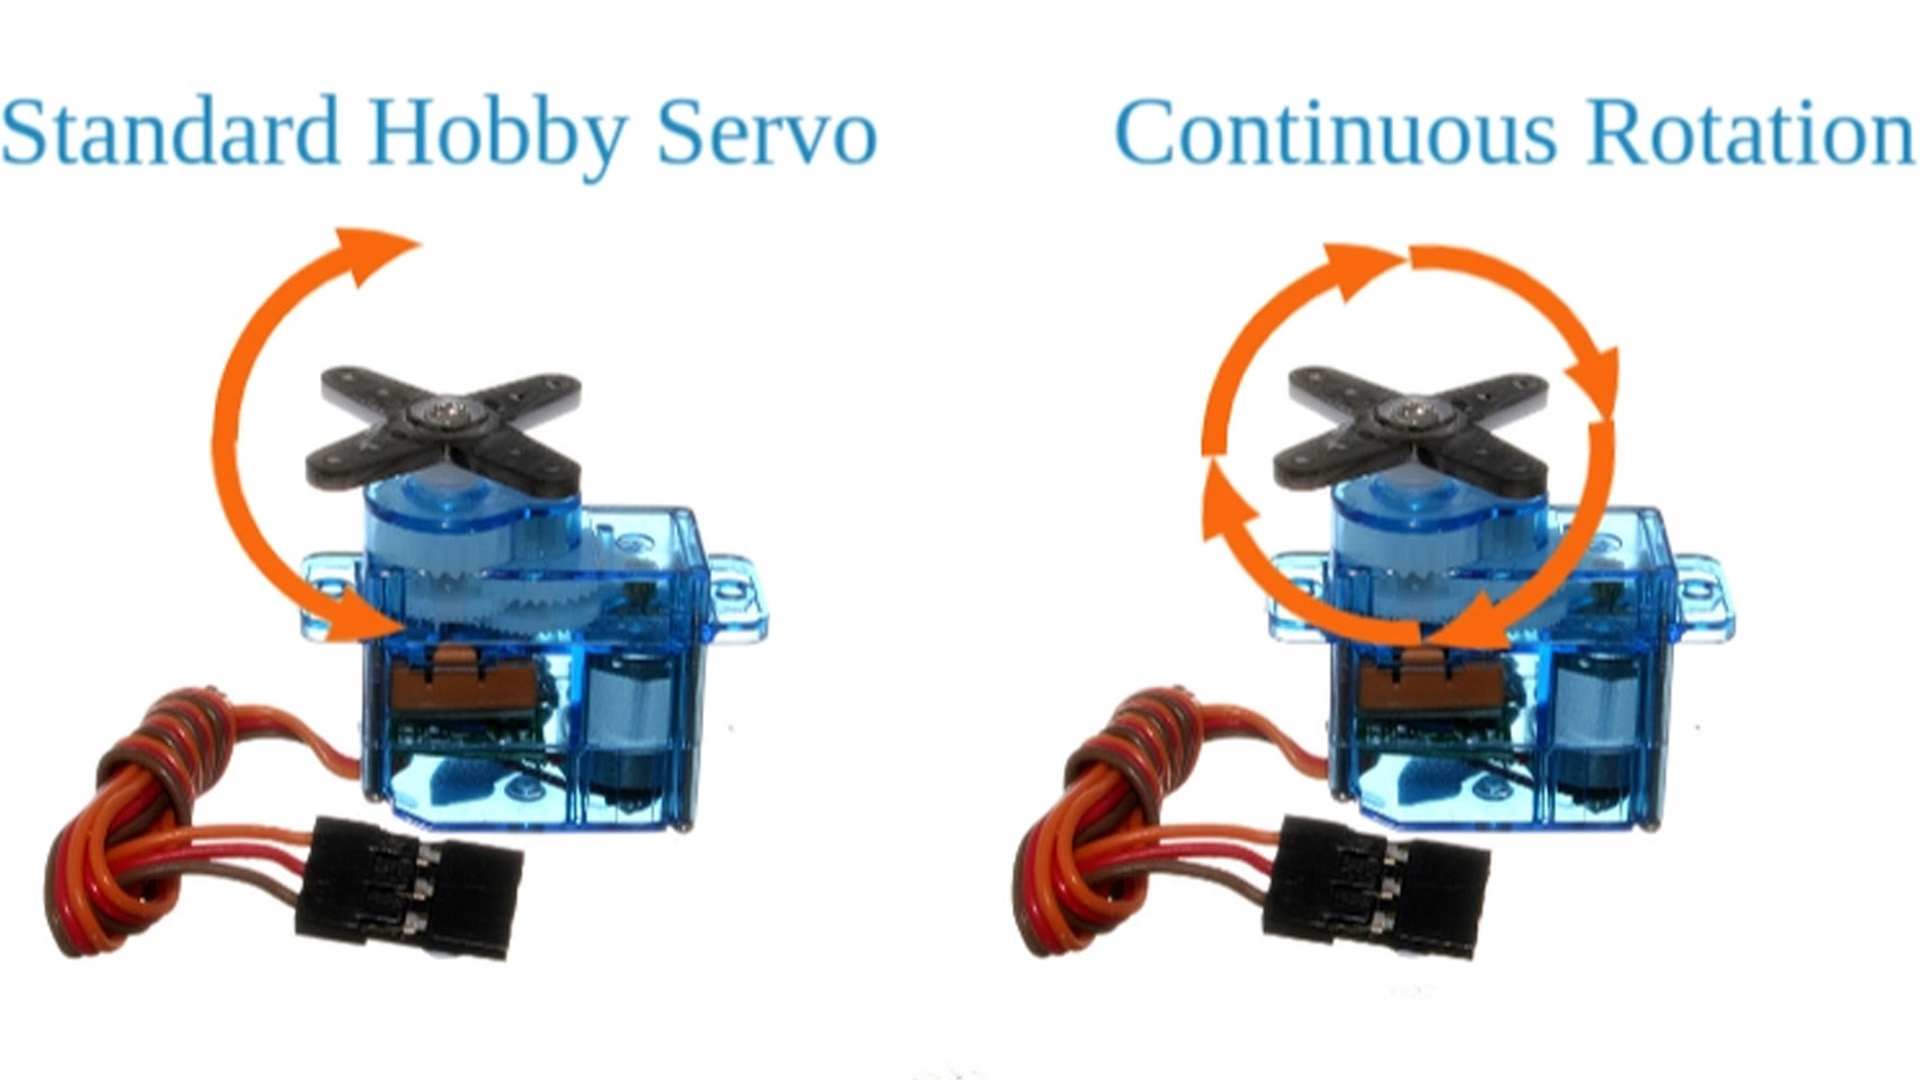
Types of servos
solomotorcontrollers.com/blog/servo-motor/
Before starting the assembly, I studied how the servos function, as they are the main components in this project. Servos use a small motor connected to gears to drive an output shaft, with a potentiometer inside to sense and adjust the shaft's angle. They have three wires: two for power and one for the control signal.
There are two main types of servo motors to consider: Fixed-Range Servos and Continuous Rotation Servos. Fixed-range servos can control their position within a limited range of motion, while continuous rotation servos offer control over speed and direction but do not have a fixed position.
-
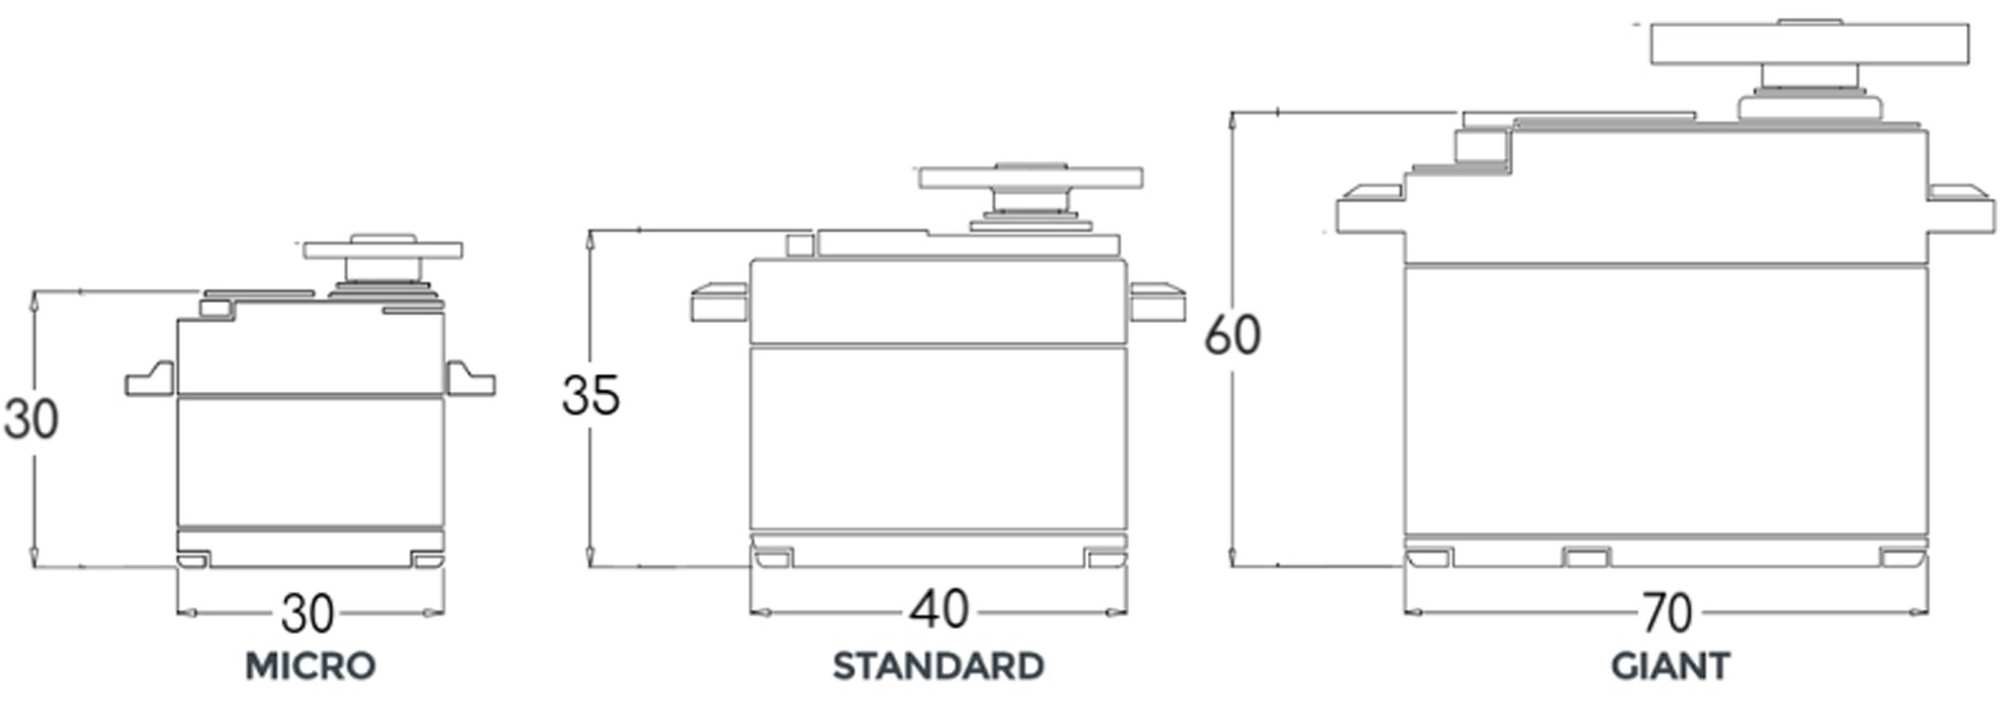
Servo Sizes
solomotorcontrollers.com/blog/servo-motor/
For this experiment, fixed-range servos with around 180 degrees were chosen, since using servos with a smaller range would limit the drawing area. Also, Micro Servos or 9g Models are lightweight and affordable. Examples include the SG90 analog motors, which are widely available and weigh about 9g.
While more powerful motors can deliver better results, they also draw more current. This could be a concern if you're powering everything from a single source, like a Raspberry Pi, so finding a balance between performance and power consumption is important.
-
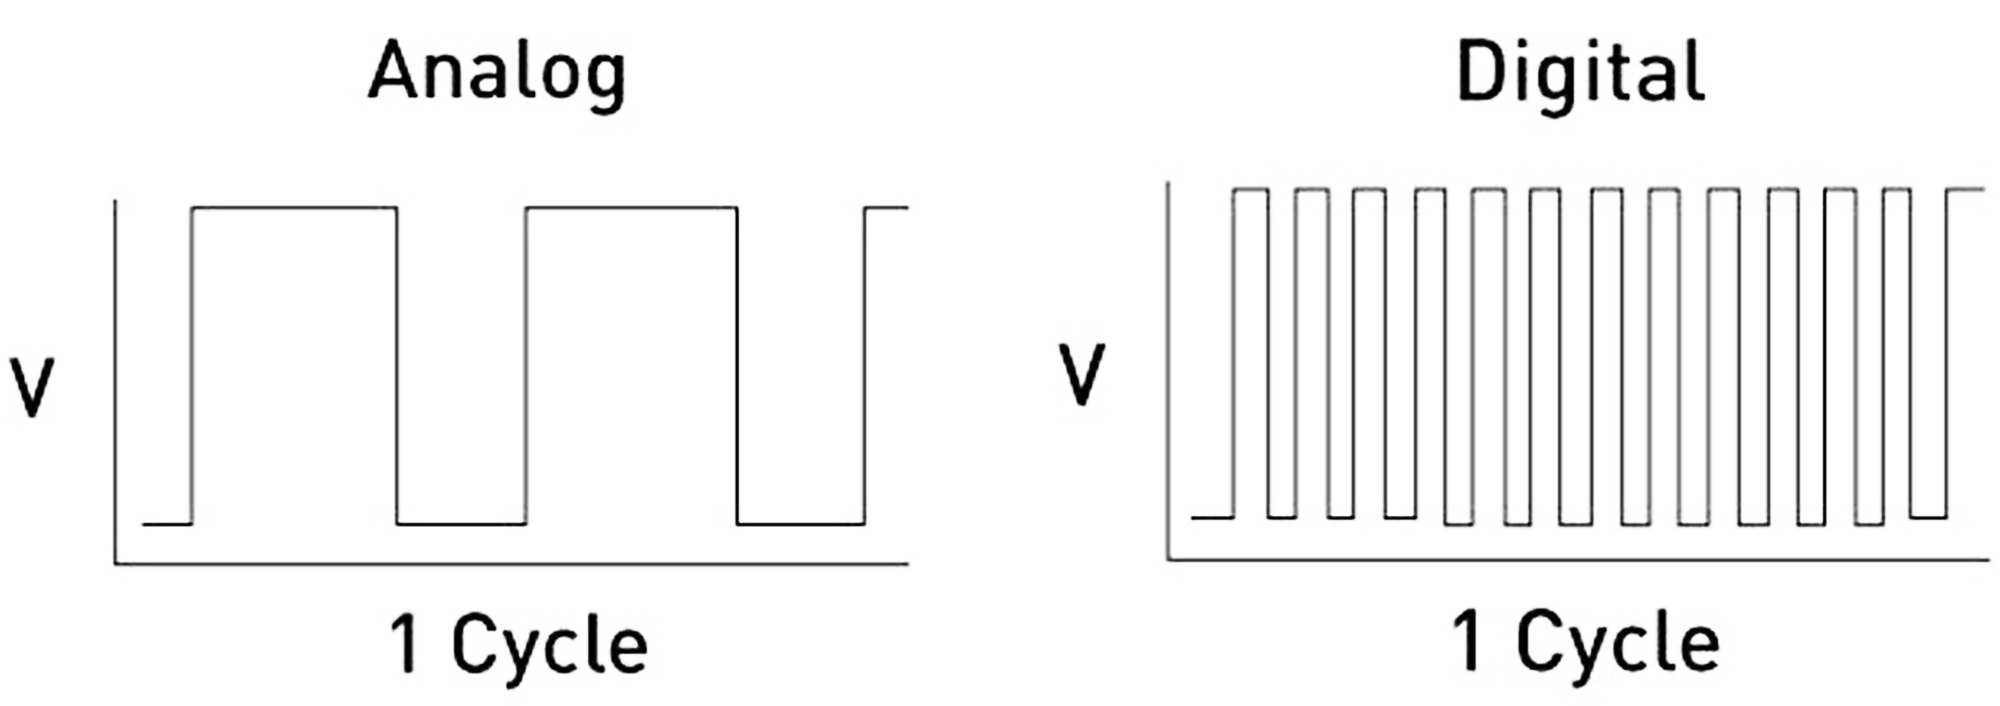
Pulse Width Modulation of Analog and Digital Servos
islproducts.com/design-note/servo-motor-fundamentals/
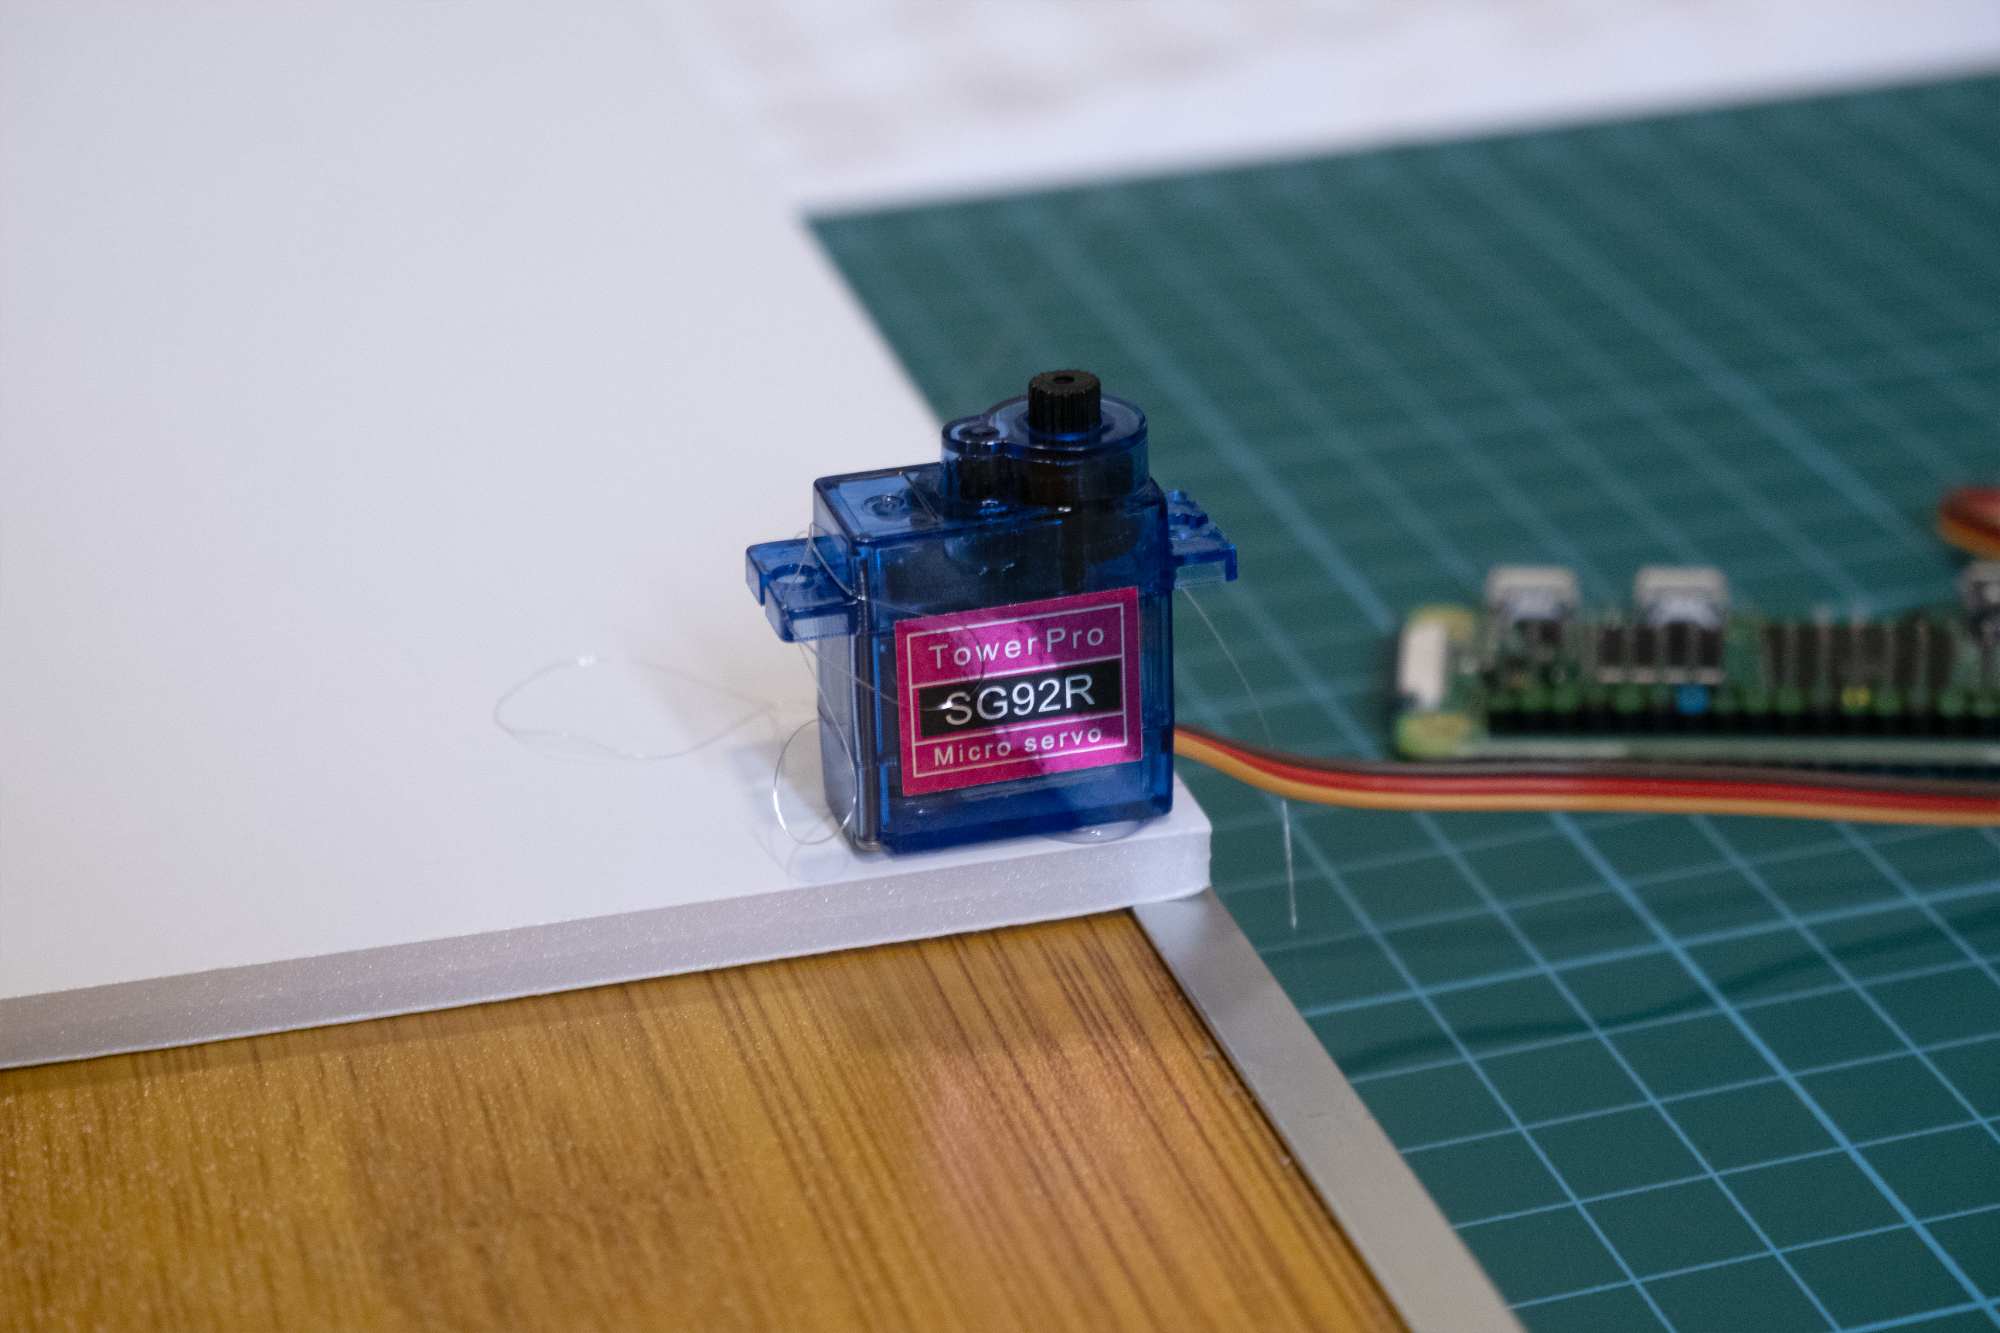
SG90 motors are analog, meaning they use a small circuit to convert pulse-widths into a range of motor angles, resulting in smoother movements that are less prone to rapid oscillation. Digital servos, such as the TowerPro SG92R, have two states, so they tend to be faster and more powerful but can cause issues in certain setups due to their aggressive error correction. This often leads to "twitching," where the motor rapidly oscillates because it continually overshoots and tries to correct itself.
Despite the potential for "twitchiness," I opted for the SG92R servos with a 180-degree range, as I wanted to see how erratic movements would apply. Rather than viewing this as a flaw, it could be a feature that adds organic variation and character to the drawings. It could be a unique, unpredictable aspect to the output, something that aligns with the concept of randomness. Aside from that, varying the speed, sequence, and rhythm of the movements can introduce different textures and visual effects.
Building the Drawing Machine
-
Making the Base
Jung Yun So
-
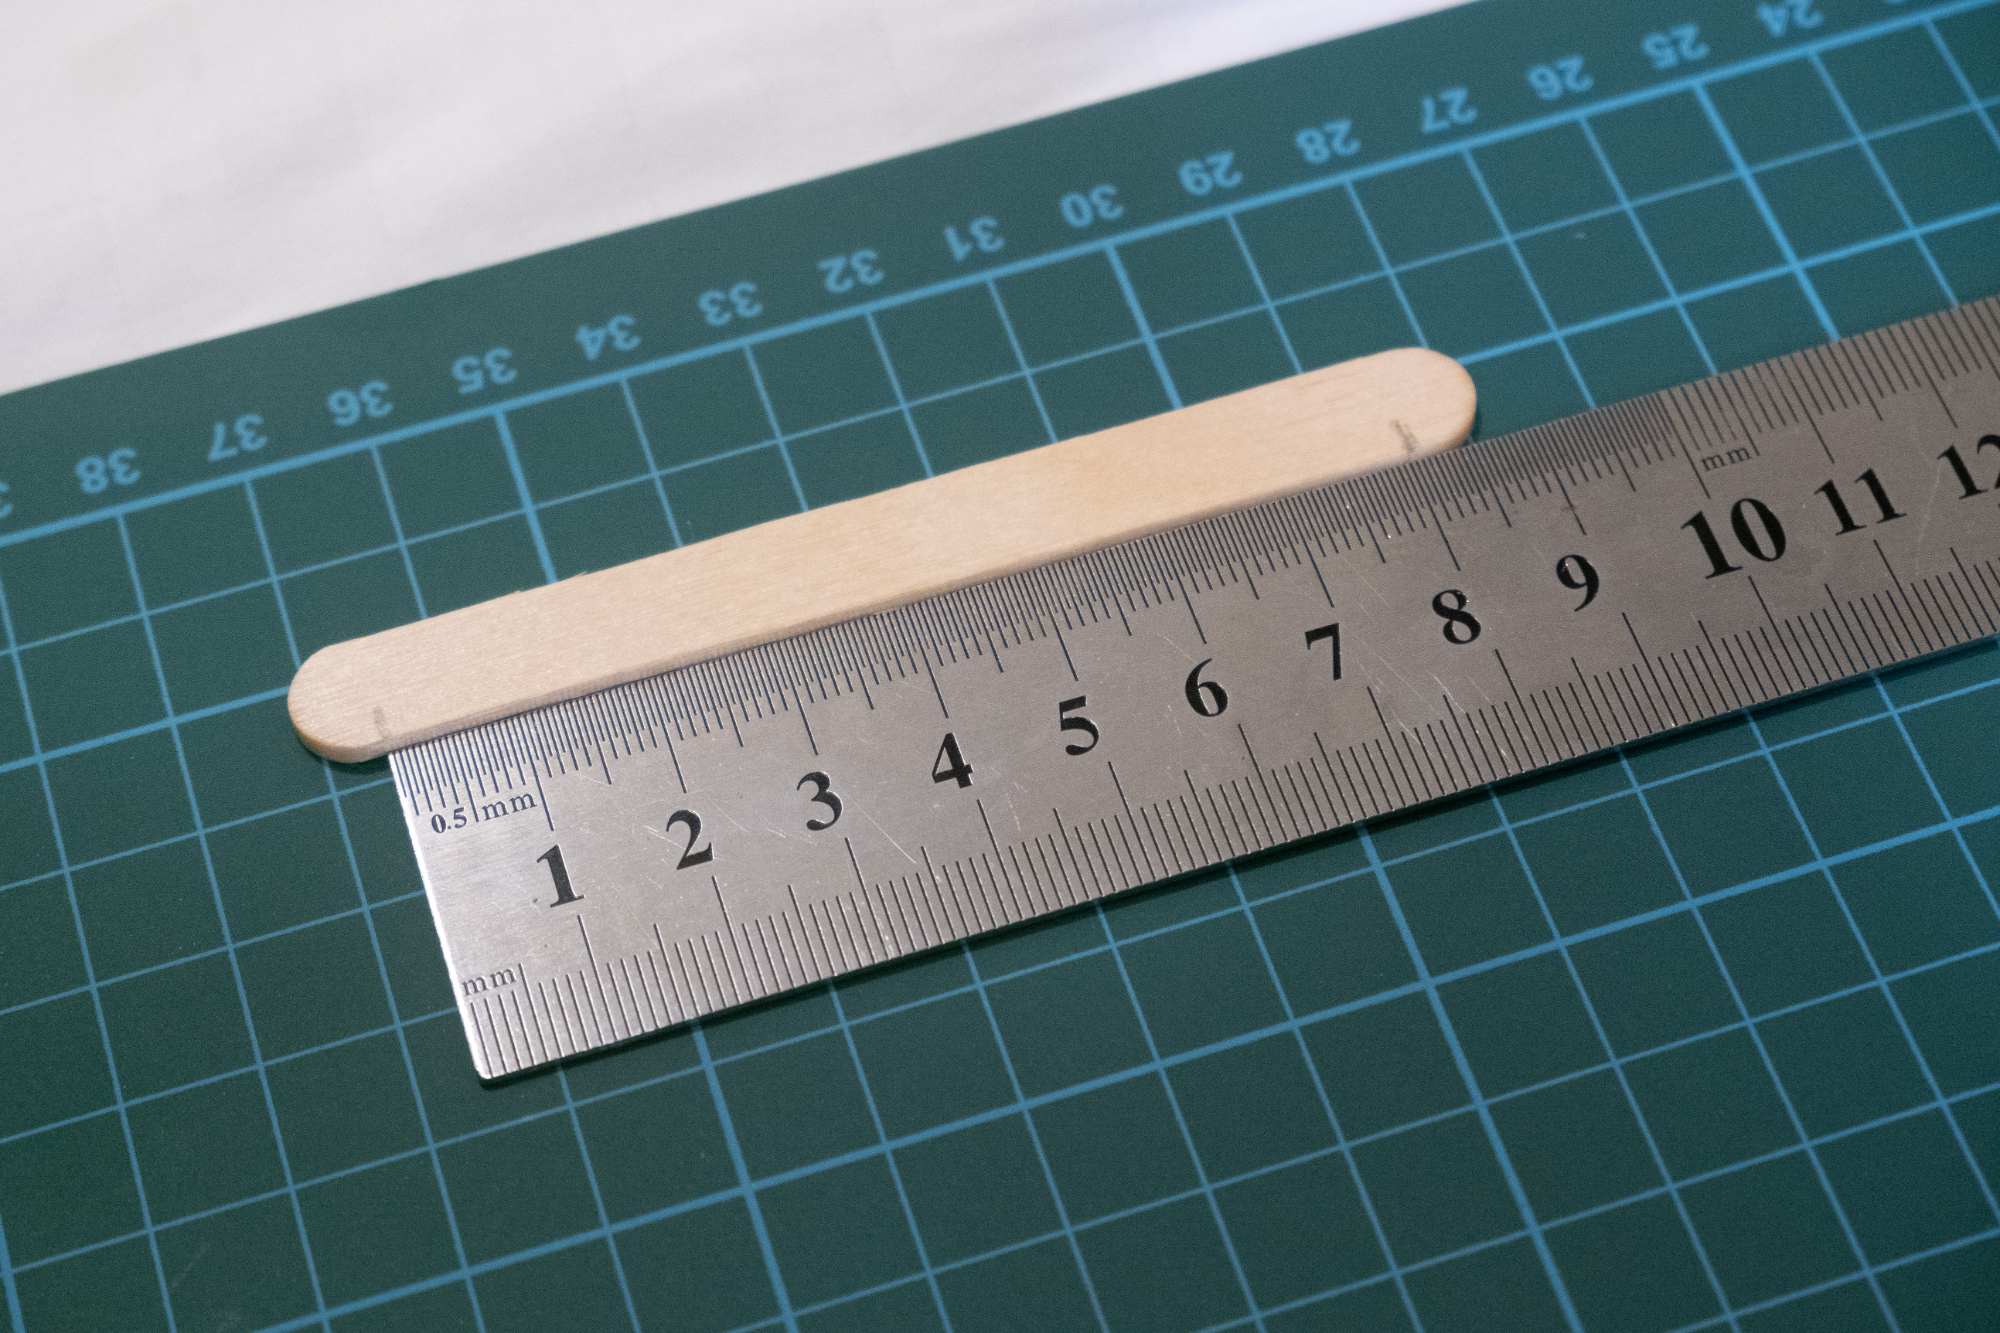
Measuring the 'Arm'
Jung Yun So
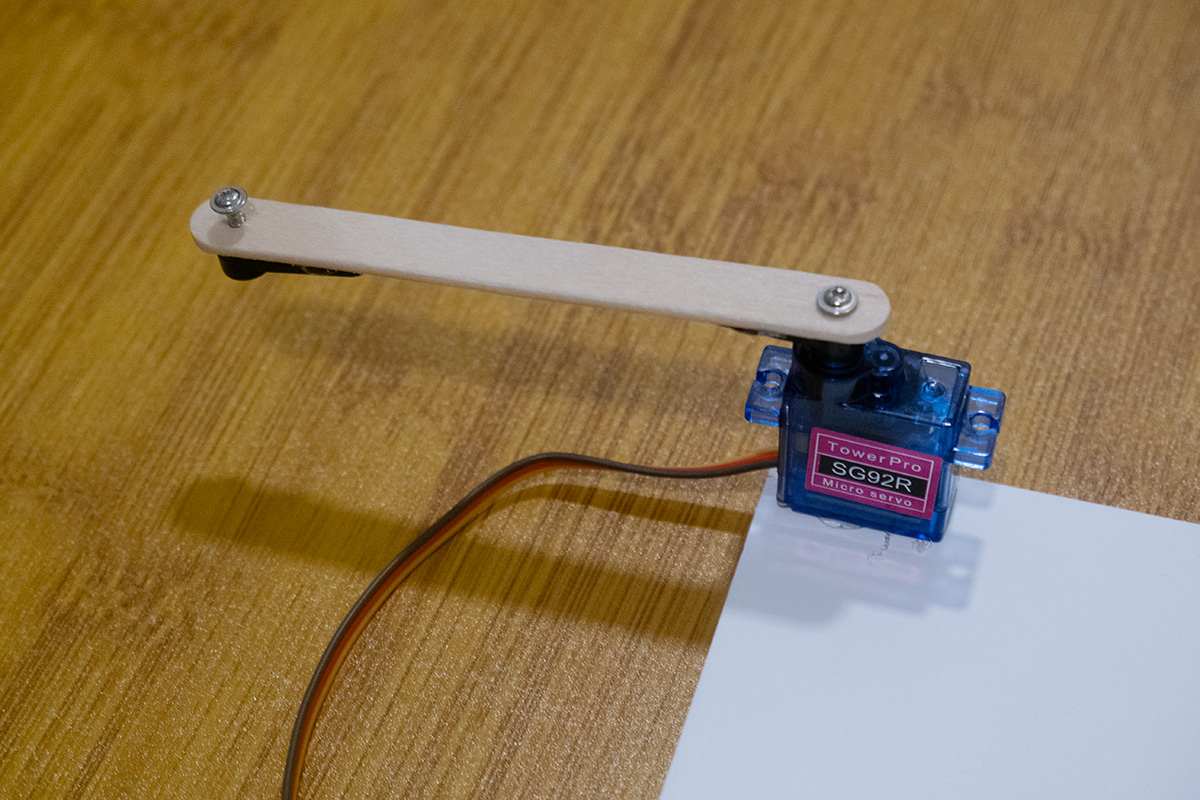
I began by gluing one servo to a corner of the baseplate using a hot glue gun for stability. But for better results during drawing, I might need to weigh down the baseplate.
The lolly sticks will be the BrachioGraph's arms. I marked 8cm lengths on each stick to indicate where to poke the holes for the centre of rotation.
-
Upper 'Arm'
Jung Yun So
-
Rotation Centre
Jung Yun So
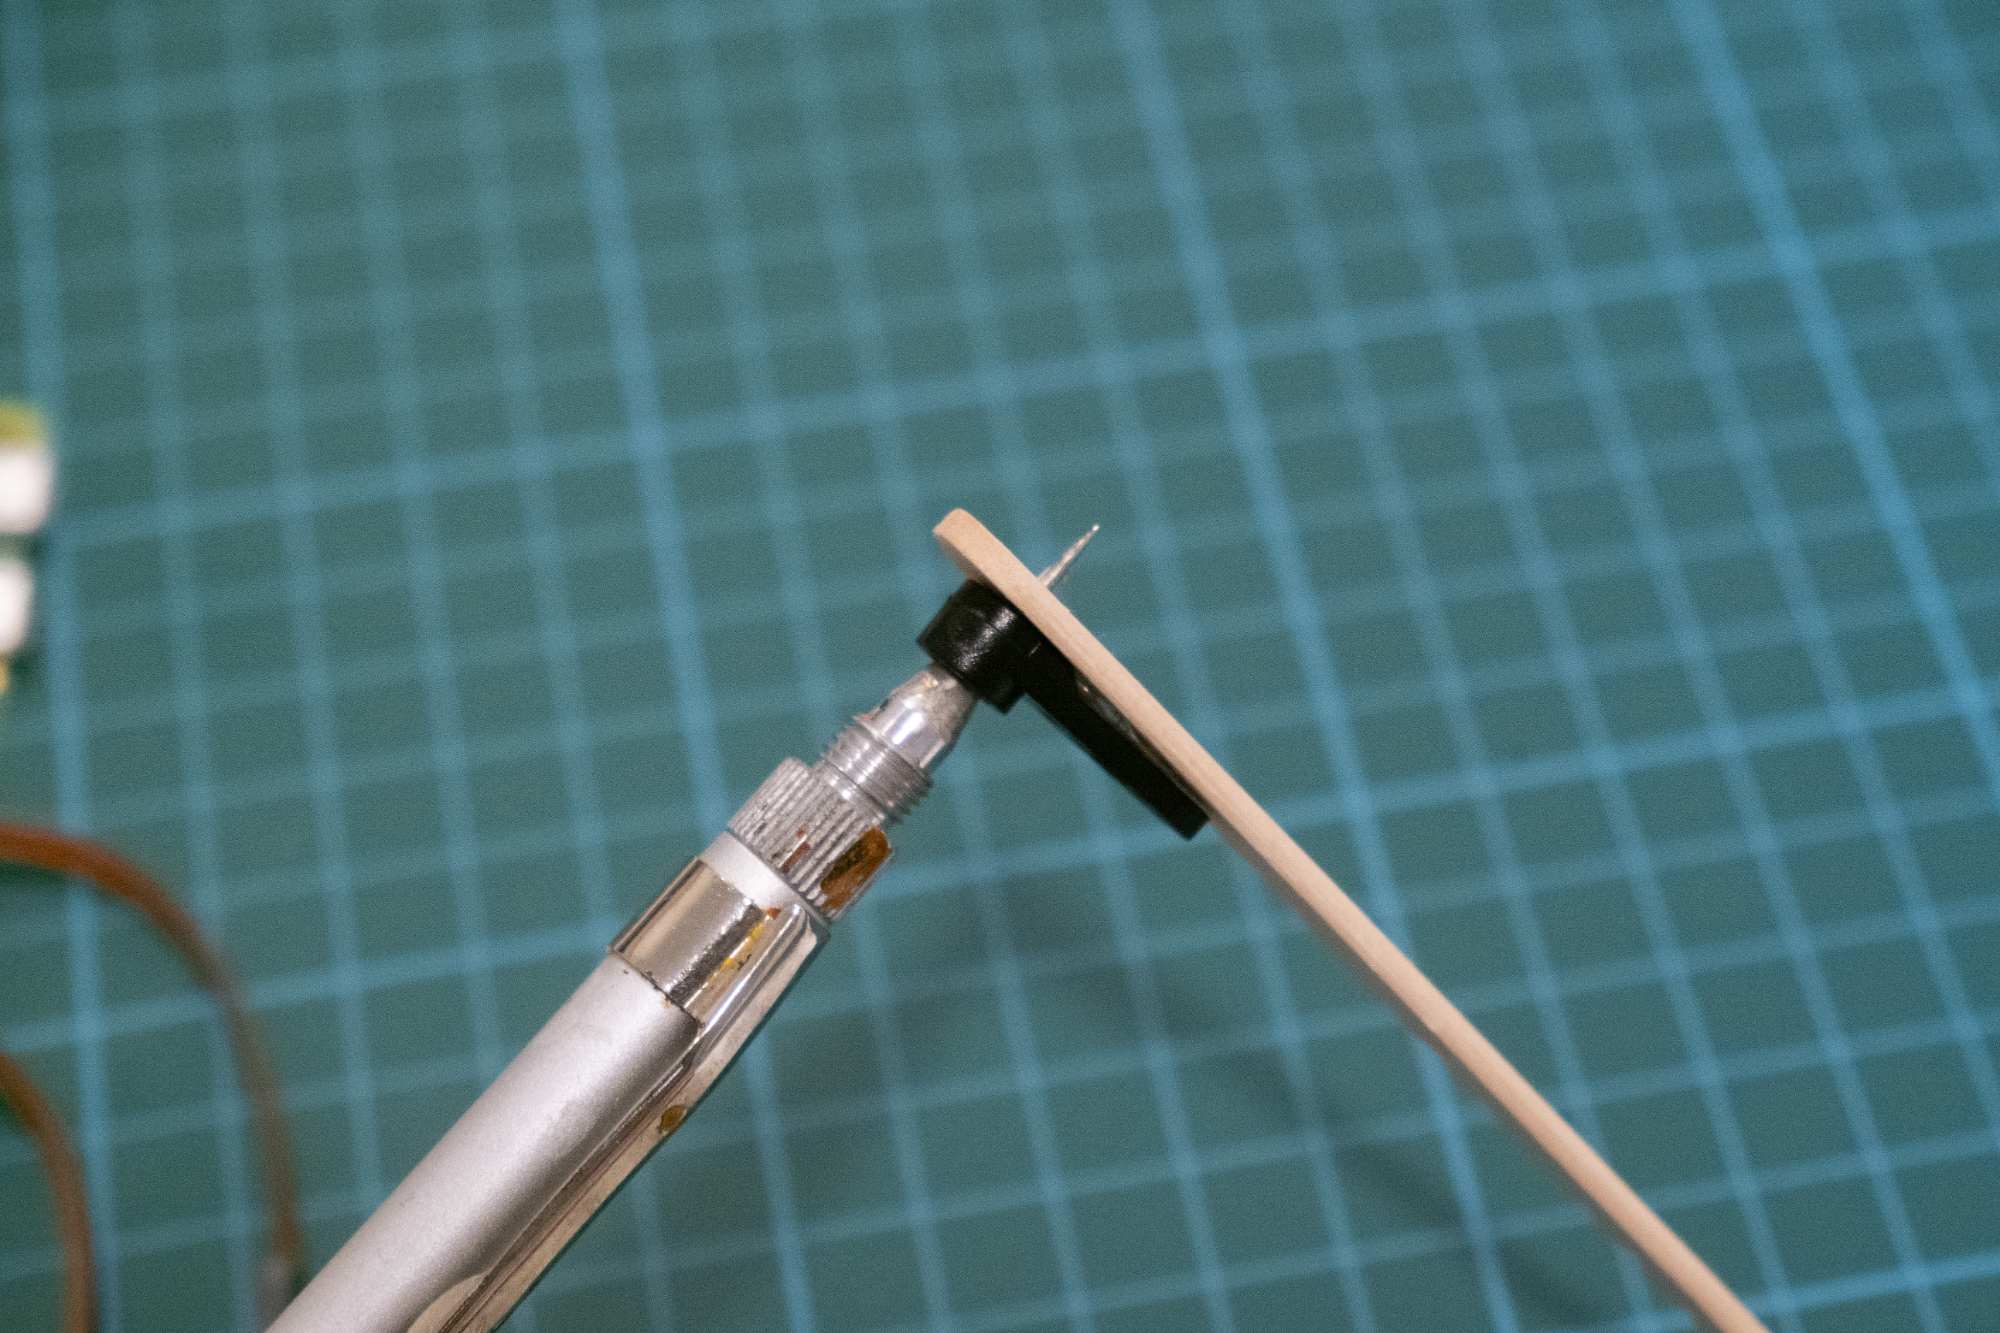
For the upper arm, I glued two servo horns onto one lolly stick at the marks. I also drilled holes through the centres of the horns and the stick, allowing easy attachment and removal.
Initially, drilling holes with a thin awl caused the wood to crack, so I switched to a sharp cutter to create precise holes.
-

The Pen Holder
Jung Yun So
-
Lower 'Arm'
Jung Yun So
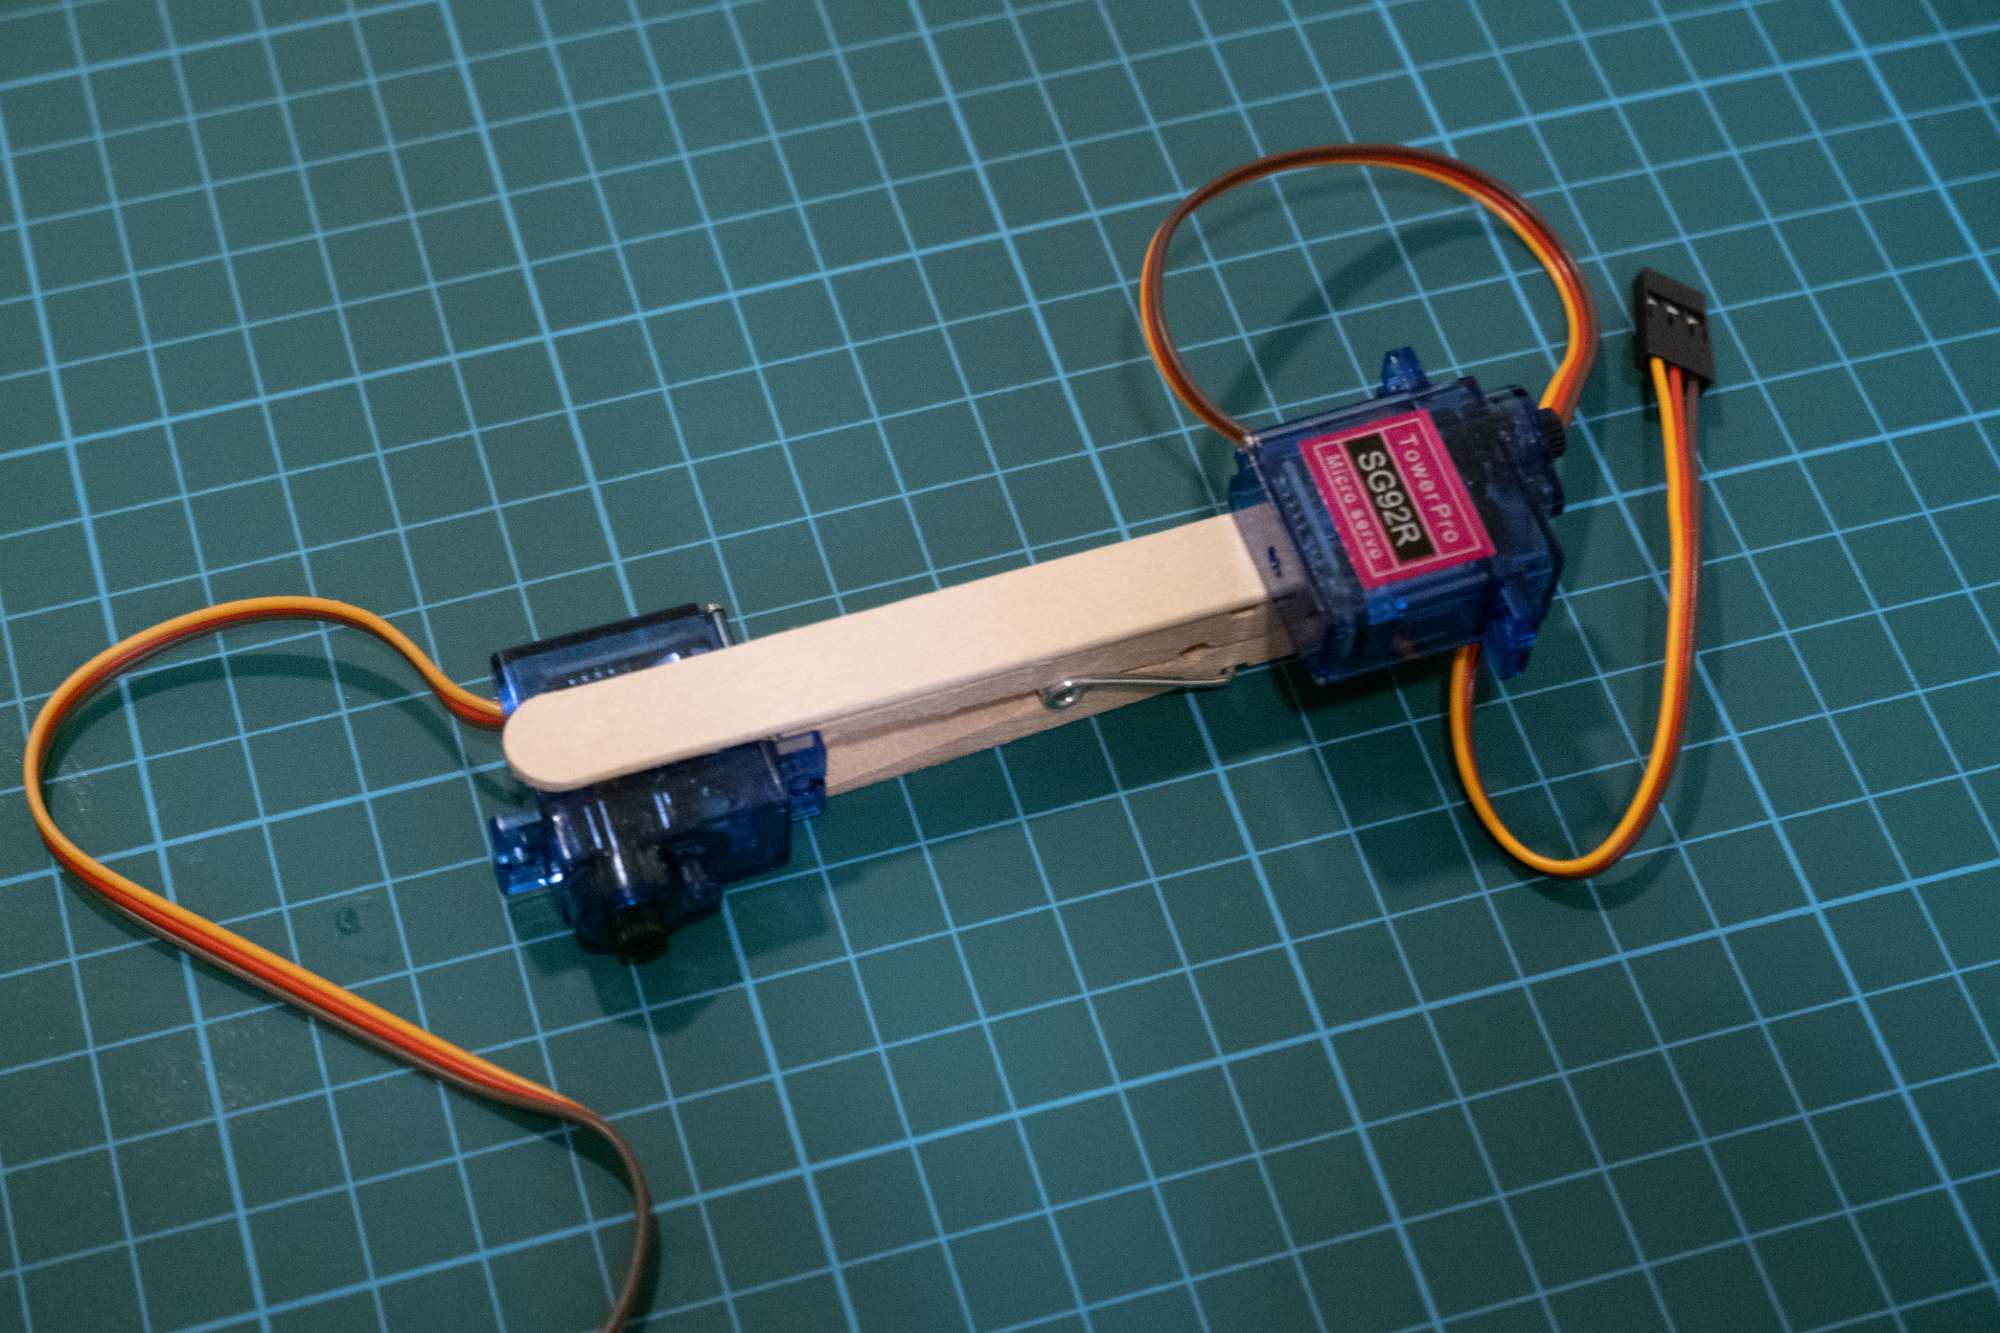
Moving on to the lower arm and pen mechanism. I attached a clothes peg to one end of a second lolly stick to hold the pen. I tried different lengths for the wooden tongs, and found that a 6cm length was most suitable.
I added another servo to the other end to control the pen. The placement of the motors were decided based on the height of the base plate, so that the edge of the motors would not interfere with the drawing.
-
Circuit
Jung Yun So
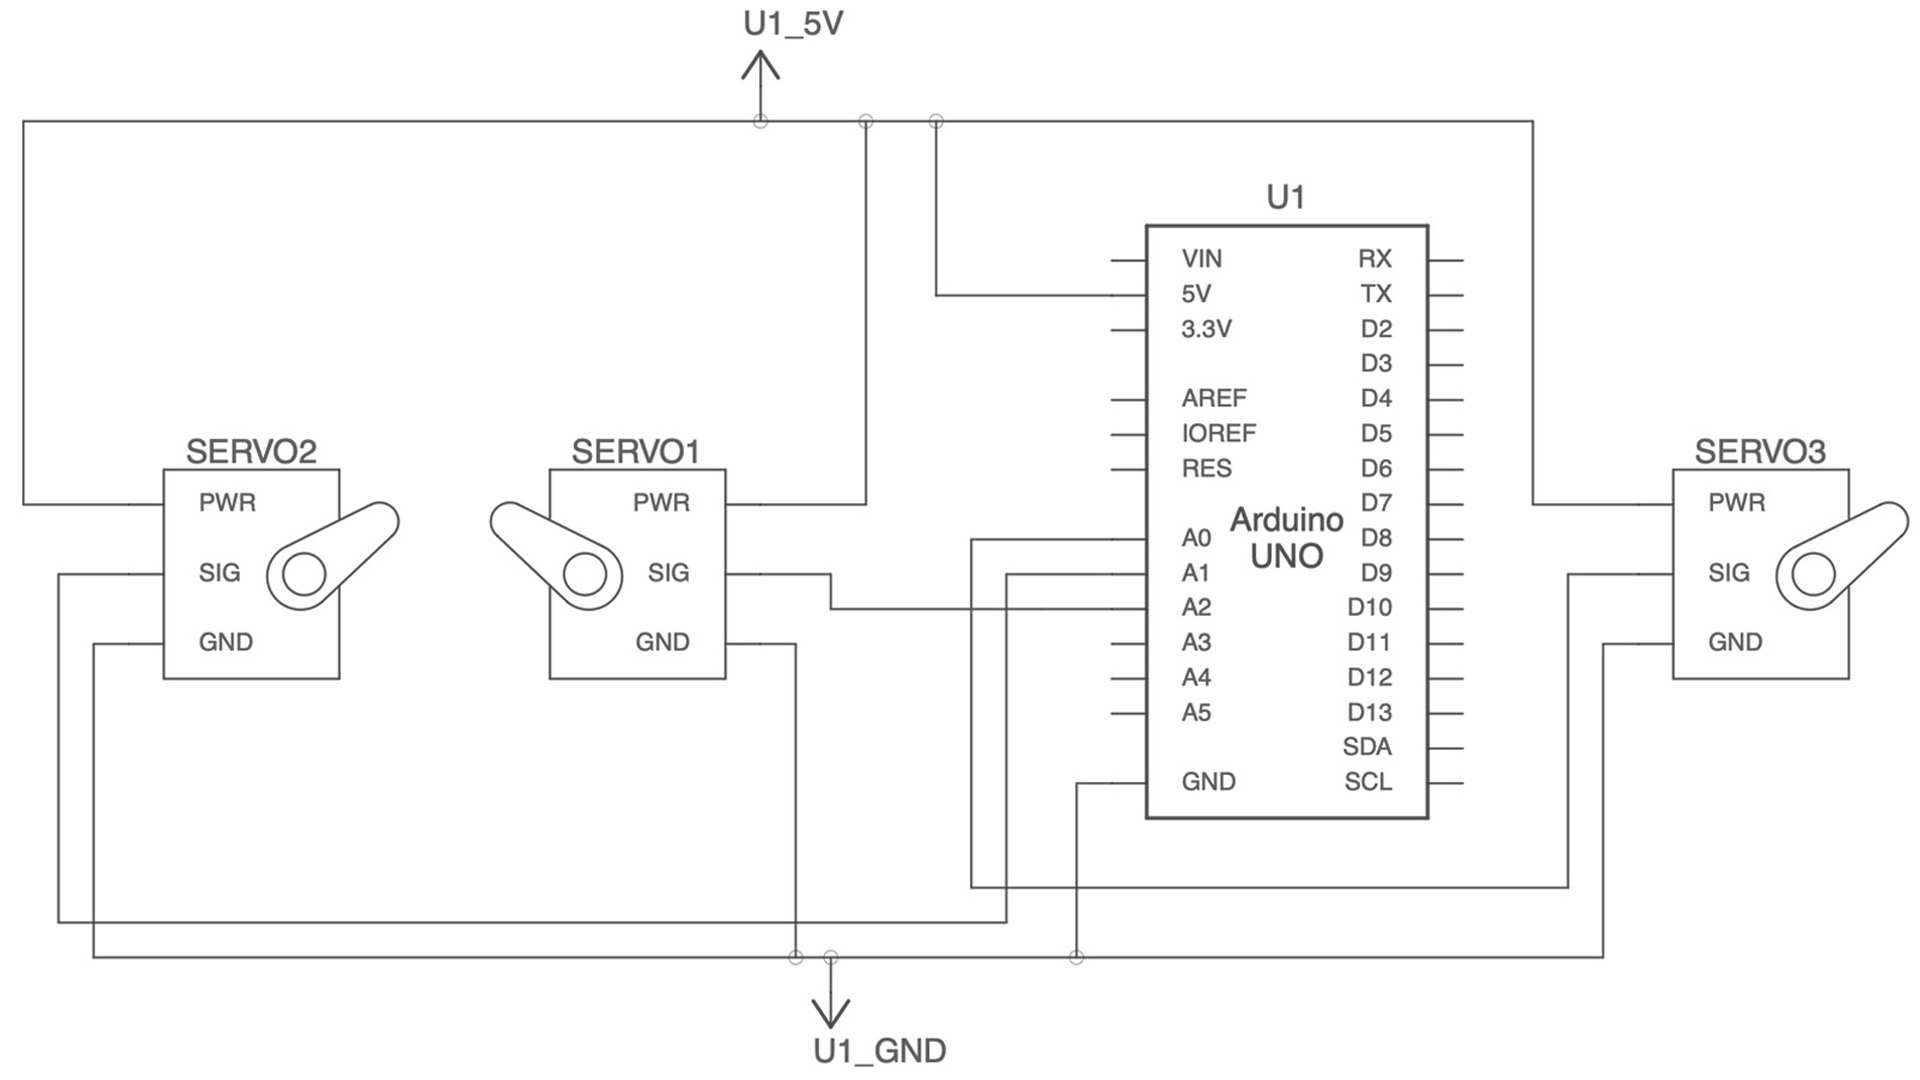
With the parts assembled, I moved on to wiring. Since the Raspberry Pi doesn’t have enough 5V pins to power all three servos, I created a wiring loom using a breadboard and jumper wires. The breadboard allowed me to efficiently distribute 5V power to the servos.
Connecting to the Arduino
-
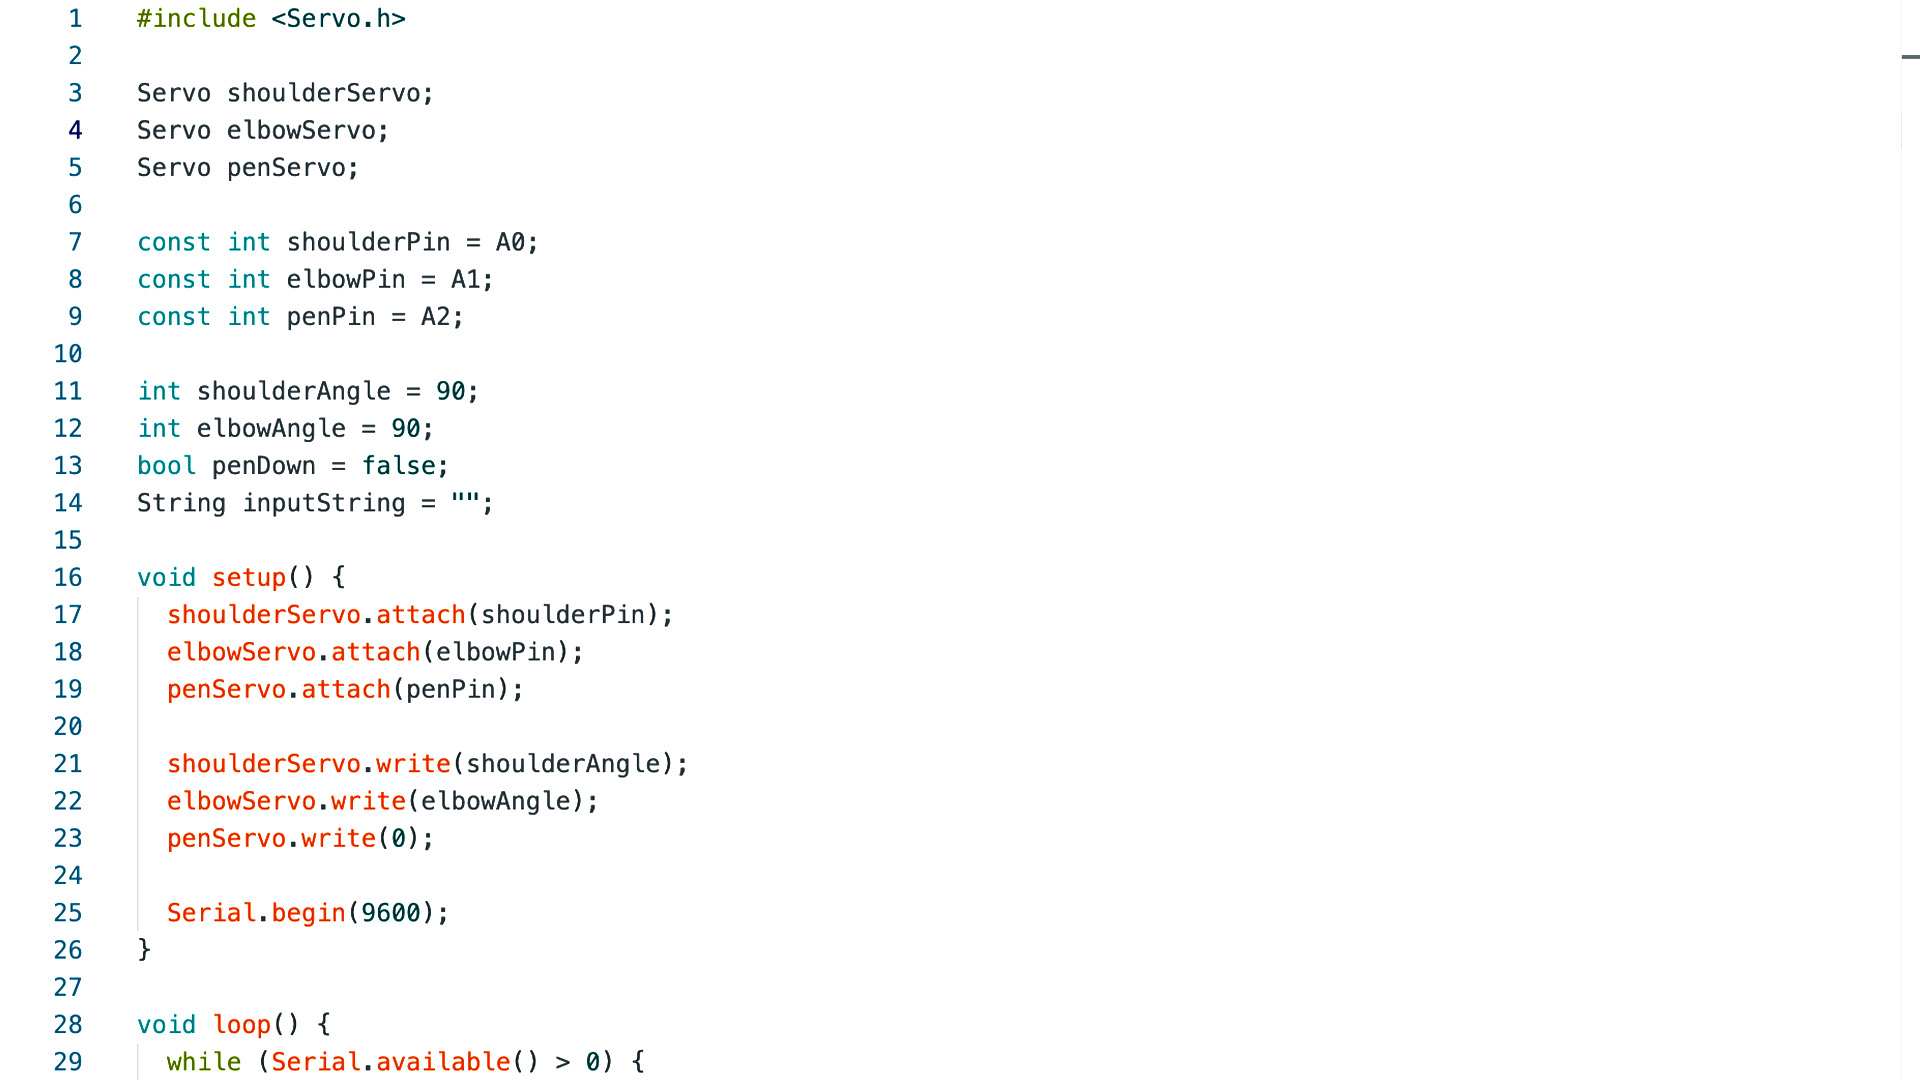
Arduino Code
Jung Yun So
Instead of using a Raspberry Pi, I connected an Arduino. There were several reasons for this choice, including the technical difficulties I had connecting my Raspberry Pi Zero headlessly through the public Wi-Fi at home.
Switching to Arduino made sense, since it lets me code based on my own logic. This also made it easy to integrate the pulse sensor I bought from Sim Lim Tower, since they are all within a single Arduino IDE file.
Testing
This was more of an experiment without a definite logic or set parameters. My goal was simply on making the plotter exhibit a certain rapidness or behavior based on the pulse input.
I like the initial testing results which show erratic and jerky movement. They remind me of myoclonus—those sudden, involuntary muscle twitches or bursts of energy that happen without conscious control. Maybe this could be a component; capturing a raw, almost unfiltered expression of the pulse data, much like the spontaneous nature of myoclonus itself.
I like the initial testing results which show erratic and jerky movement. They remind me of myoclonus—those sudden, involuntary muscle twitches or bursts of energy that happen without conscious control. Maybe this could be a component; capturing a raw, almost unfiltered expression of the pulse data, much like the spontaneous nature of myoclonus itself.
It's also interesting to observe the interplay between voluntary and involuntary elements in each iteration. The pulse sensor requires a flat, stable surface for accurate readings, meaning that even slight, unintentional hand movements become a form of involuntary input. Normally, I'd find this frustrating and would try to isolate the heartbeat as much as possible. However, this time, I see it as a serendipitous insight arising from the process of making. What other involuntary disturbances can I embrace as ‘artistic variation’? For now, I'll be documenting these outcomes and, over the coming weeks, reflecting on whether this could lead to something else.
Looking Ahead
As for my next step, it's already decided in my mind: I'll be using EEG data as the input, with each wave controlling different motors. I am excited to share that I've successfully acquired an EEG headset for $70. Considering the market price, I'd say that's a pretty good deal. It's expected to arrive in a week or two, so hopefully, it can become the next input for my brachiograph.